
User guide

How to use RapidPOS

Written for someone who has never opened the software before. Every screen below has a real picture, what each button does, what happens when you press it, and the mistakes to avoid. Work through it in order and you will be billing on the same day.

19 screens · about 25 minutes to read · no login needed

Three things worth knowing first

  • The red menu on the left is how you reach everything. Sales, Purchases, Inventory and Parties open into sub-menus when you click them.
  • Nothing is saved until you press a Save button. You can always press Cancel or navigate away to abandon a screen.
  • Every figure in your reports is built from what you enter. Enter sales but skip purchases and expenses, and your profit will look far better than it is.

Start here

Sign in, and learn to read the one screen that tells you how the business is doing.

Signing in

Getting into your account.

rapidpos.in — the first screen you see
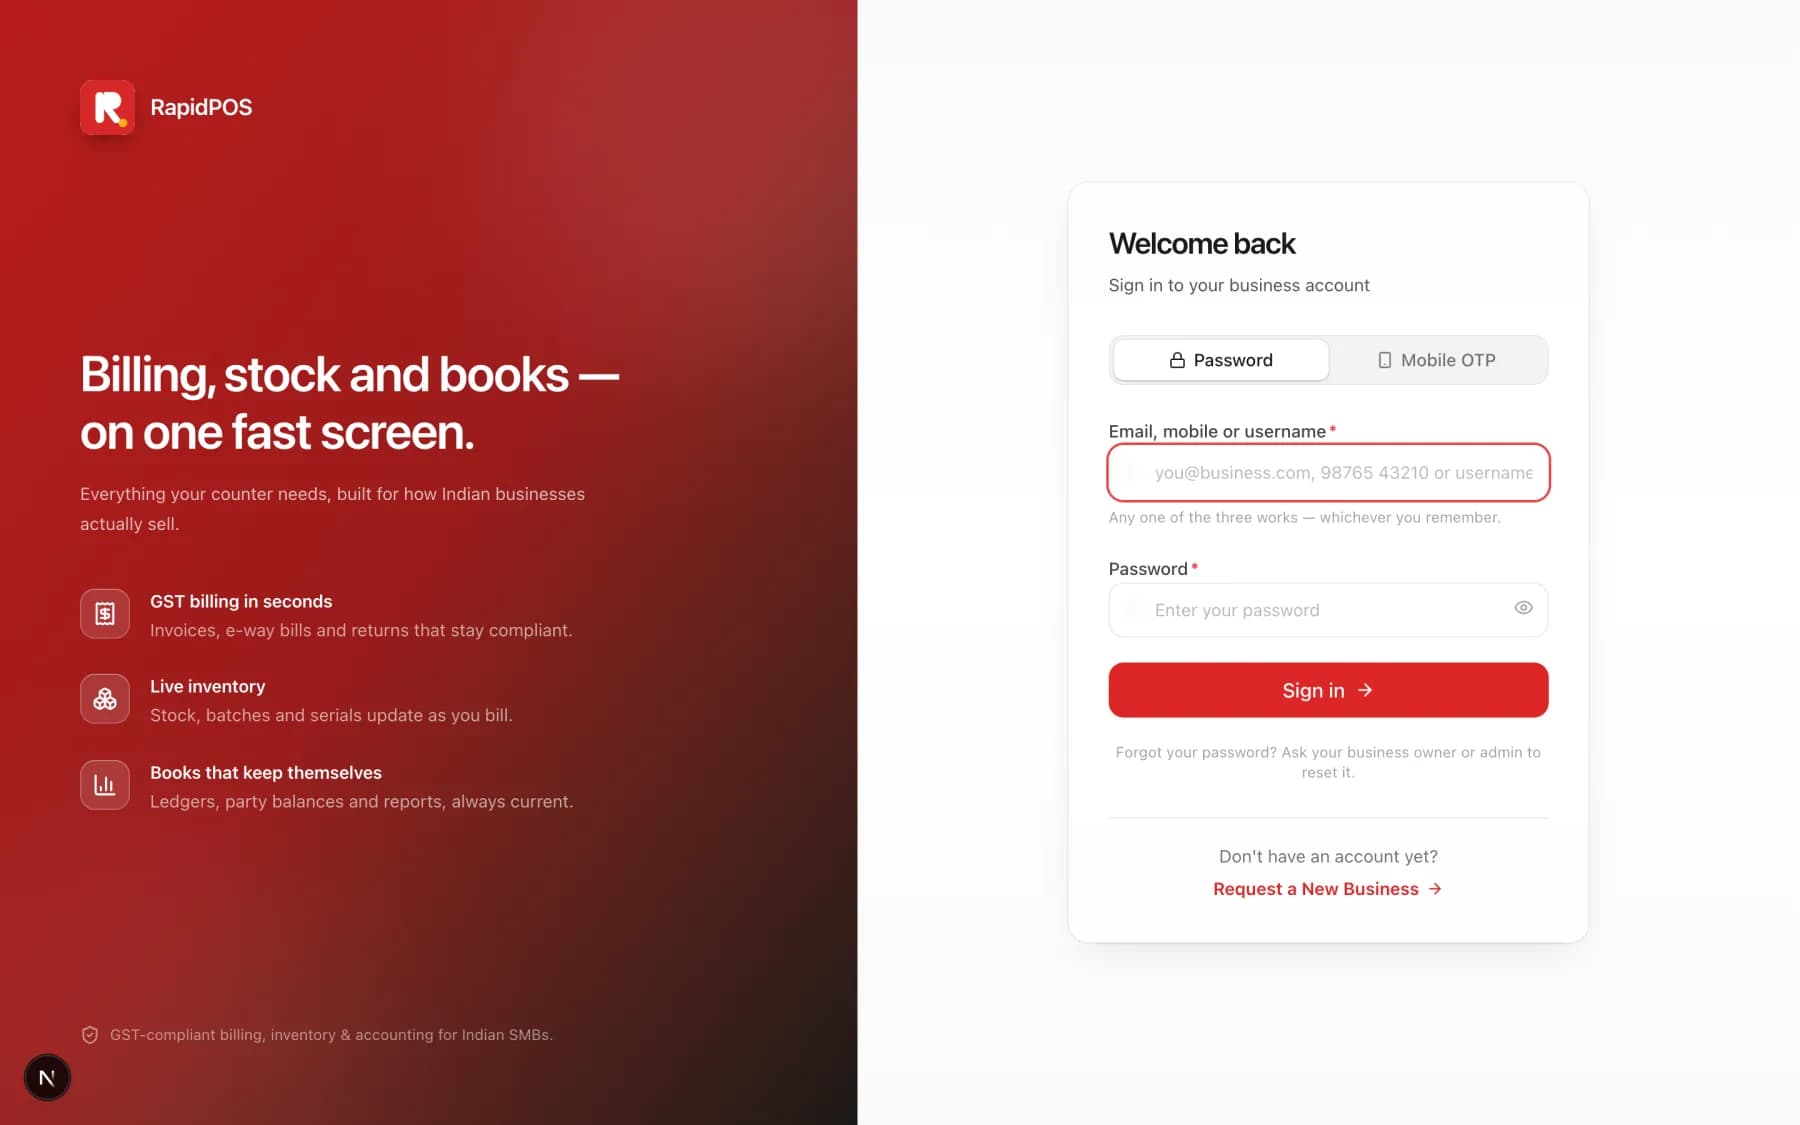
The RapidPOS sign-in screen: a red brand panel on the left, and a 'Welcome back' card on the right with Password and Mobile OTP tabs, a login field, a password field and a Sign in button.
The Signing in screen in RapidPOS.

What this screen is for

This is the front door. You sign in here once, and RapidPOS remembers you on this device until you sign out.

What each button does

Password tab
Sign in the normal way — with your login and password.
Mobile OTP tab
Sign in with your mobile number instead. RapidPOS sends a 6-digit code by SMS; type the code to get in. Useful when you have forgotten your password.
Email, mobile or username
Any one of the three works — whichever you remember. You do not need all of them.
Eye icon in the password box
Shows the password you typed, so you can check it before pressing Sign in.
Sign in
Checks your details and opens your Dashboard.
Request a New Business
For someone who does not have an account yet. Sends a request to the RapidPOS team to open a new business.

Do it step by step

  1. Open rapidpos.in in your browser.
  2. Stay on the Password tab.
  3. Type your email, mobile number or username in the first box.
  4. Type your password in the second box. Press the eye icon if you want to check what you typed.
  5. Press Sign in.

What happens after you press it

You land on the Dashboard. From here the red sidebar on the left is your menu for everything.

Tips that save time

  • Forgot your password? There is no self-service reset — ask your business owner or admin to reset it for you. If you are the owner, use Mobile OTP to get in.
  • On the counter computer, let the browser remember the page so staff only have to type the password.

Common mistakes to avoid

  • Typing the business name instead of your own login. Sign in with your personal email, mobile or username — not the shop's name.
  • Trying repeatedly with the wrong password. After too many failed attempts the account locks for a while; wait, or ask an admin to reset it.
The Dashboard

Your daily snapshot — sales, profit, cash and who owes you money.

Dashboard (the first item in the sidebar)

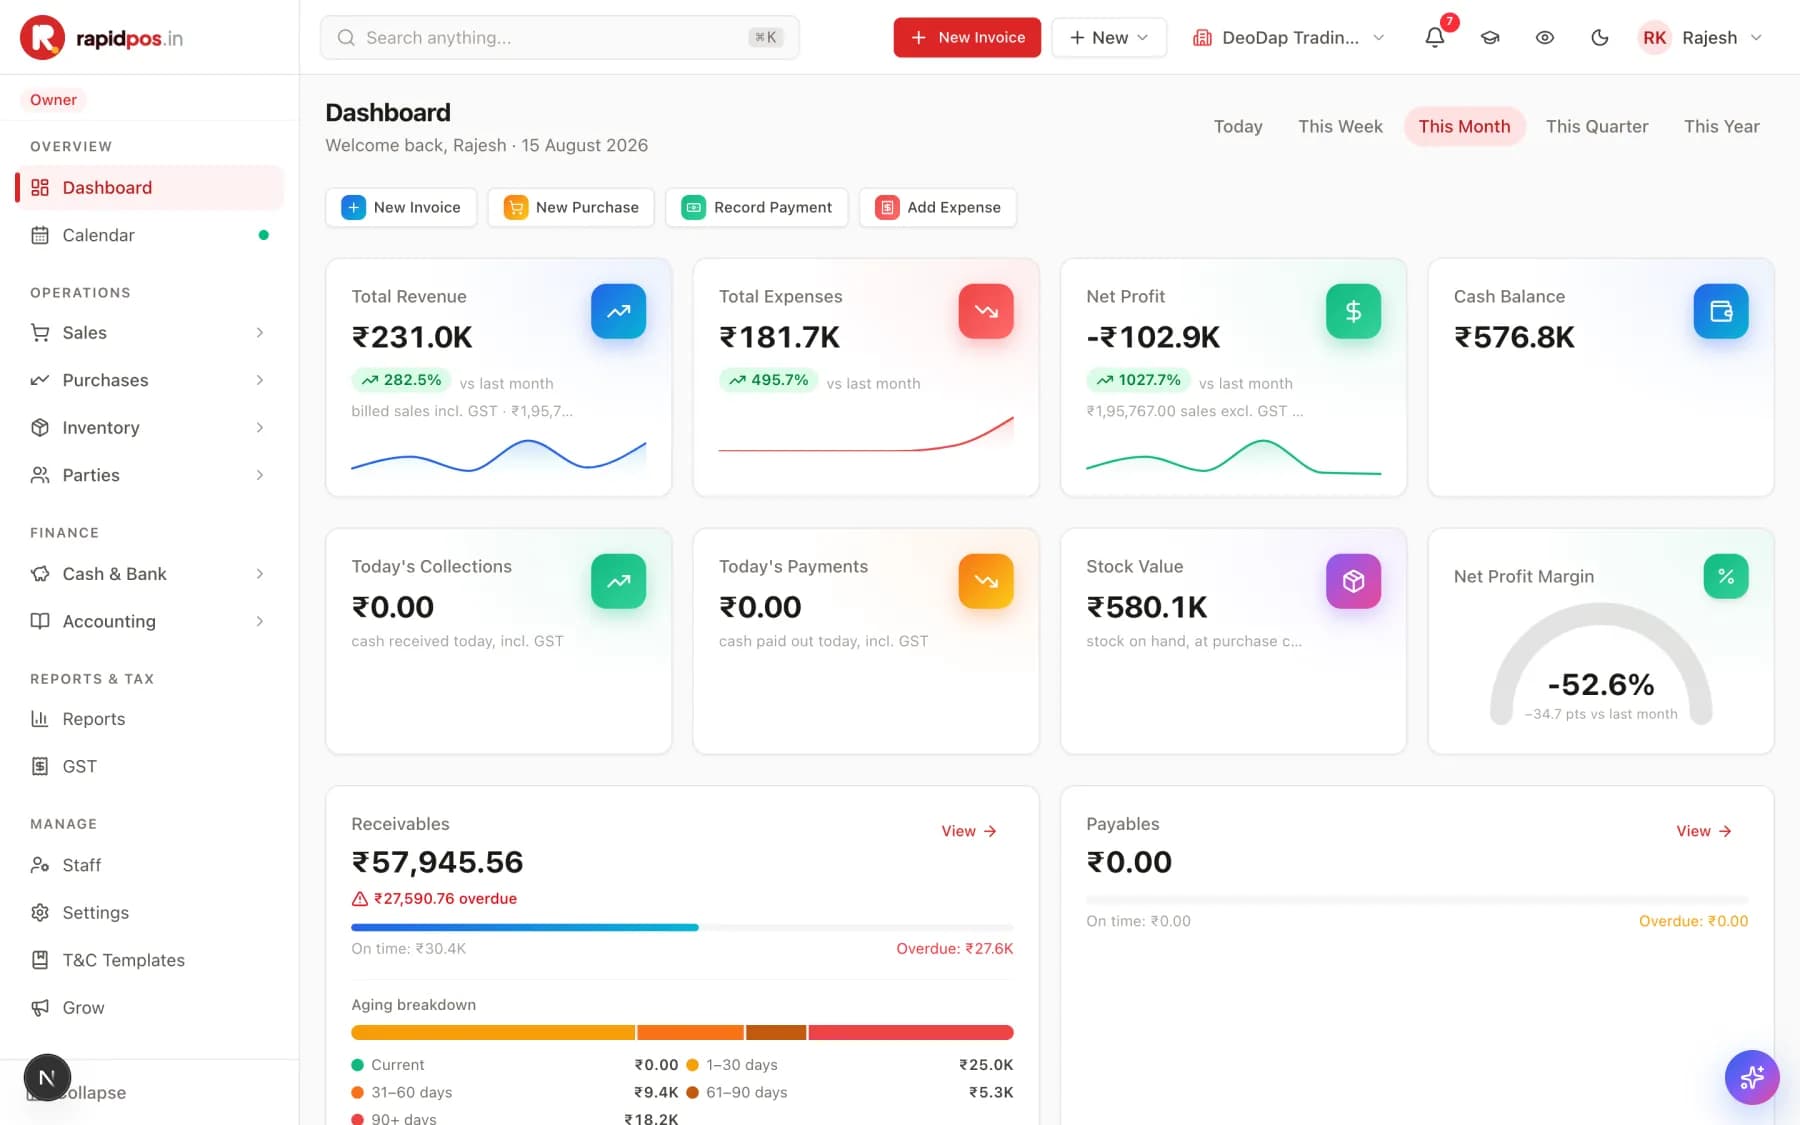
The RapidPOS Dashboard showing period tabs, four quick-action buttons, KPI cards for Total Revenue, Total Expenses, Net Profit and Cash Balance, and Receivables and Payables panels with an aging breakdown.
The The Dashboard screen in RapidPOS.

What this screen is for

One screen that answers 'how is the business doing?'. Every figure here is calculated from the invoices, purchases and payments you enter — you never type anything on this page.

What each button does

Today / This Week / This Month / This Quarter / This Year
Changes the period. Every number on the page recalculates for the period you pick. This Month is selected by default.
New Invoice
Jumps straight to a blank sales invoice — the fastest way to start billing.
New Purchase
Opens a blank purchase bill for goods you bought from a supplier.
Record Payment
Records money a customer has paid you.
Add Expense
Records money you spent — rent, salaries, electricity and so on.
Receivables → View
Opens the full list of customers who still owe you money.
Payables → View
Opens the full list of suppliers you still owe.
Eye icon (top bar)
Privacy mode. Blurs every money figure on screen so a customer standing at your counter cannot read your numbers. Press again to unblur.

Do it step by step

  1. Look at the four cards on top: Total Revenue, Total Expenses, Net Profit and Cash Balance. That is the health of the business in four numbers.
  2. Switch the period at the top right if you want a different window — for example, press Today before closing for the day.
  3. Scroll to Receivables. The Aging breakdown shows how old the unpaid money is: Current, 1–30 days, 31–60, 61–90 and 90+ days.
  4. Anything sitting in 90+ days needs a phone call today.
  5. Use the four quick-action buttons to start your next job without hunting through the menu.

What happens after you press it

Nothing is saved or changed by looking at the Dashboard — it is read-only. Figures update automatically the moment you save an invoice, payment or expense.

Tips that save time

  • The bell icon in the top bar collects alerts — low stock and overdue payments — so check it once each morning.
  • Press Ctrl+K (or ⌘K on a Mac) anywhere in RapidPOS to search for any screen, customer or item by name.
  • The building name in the top bar is the business switcher. If you run more than one business, switch here — and always check you are in the right one before billing.

Common mistakes to avoid

  • Panicking at a low Net Profit before entering purchases. Profit looks wrong until both your sales AND your purchases/expenses are entered.
  • Comparing figures without noticing the period. A 'drop in sales' is usually just This Week being compared against This Month.

Set it up once

Four jobs to do before your first bill. Do them in this order and everything afterwards is fast.

Your business details

Name, address, GSTIN and logo — these print on every invoice.

Settings → Business Profile

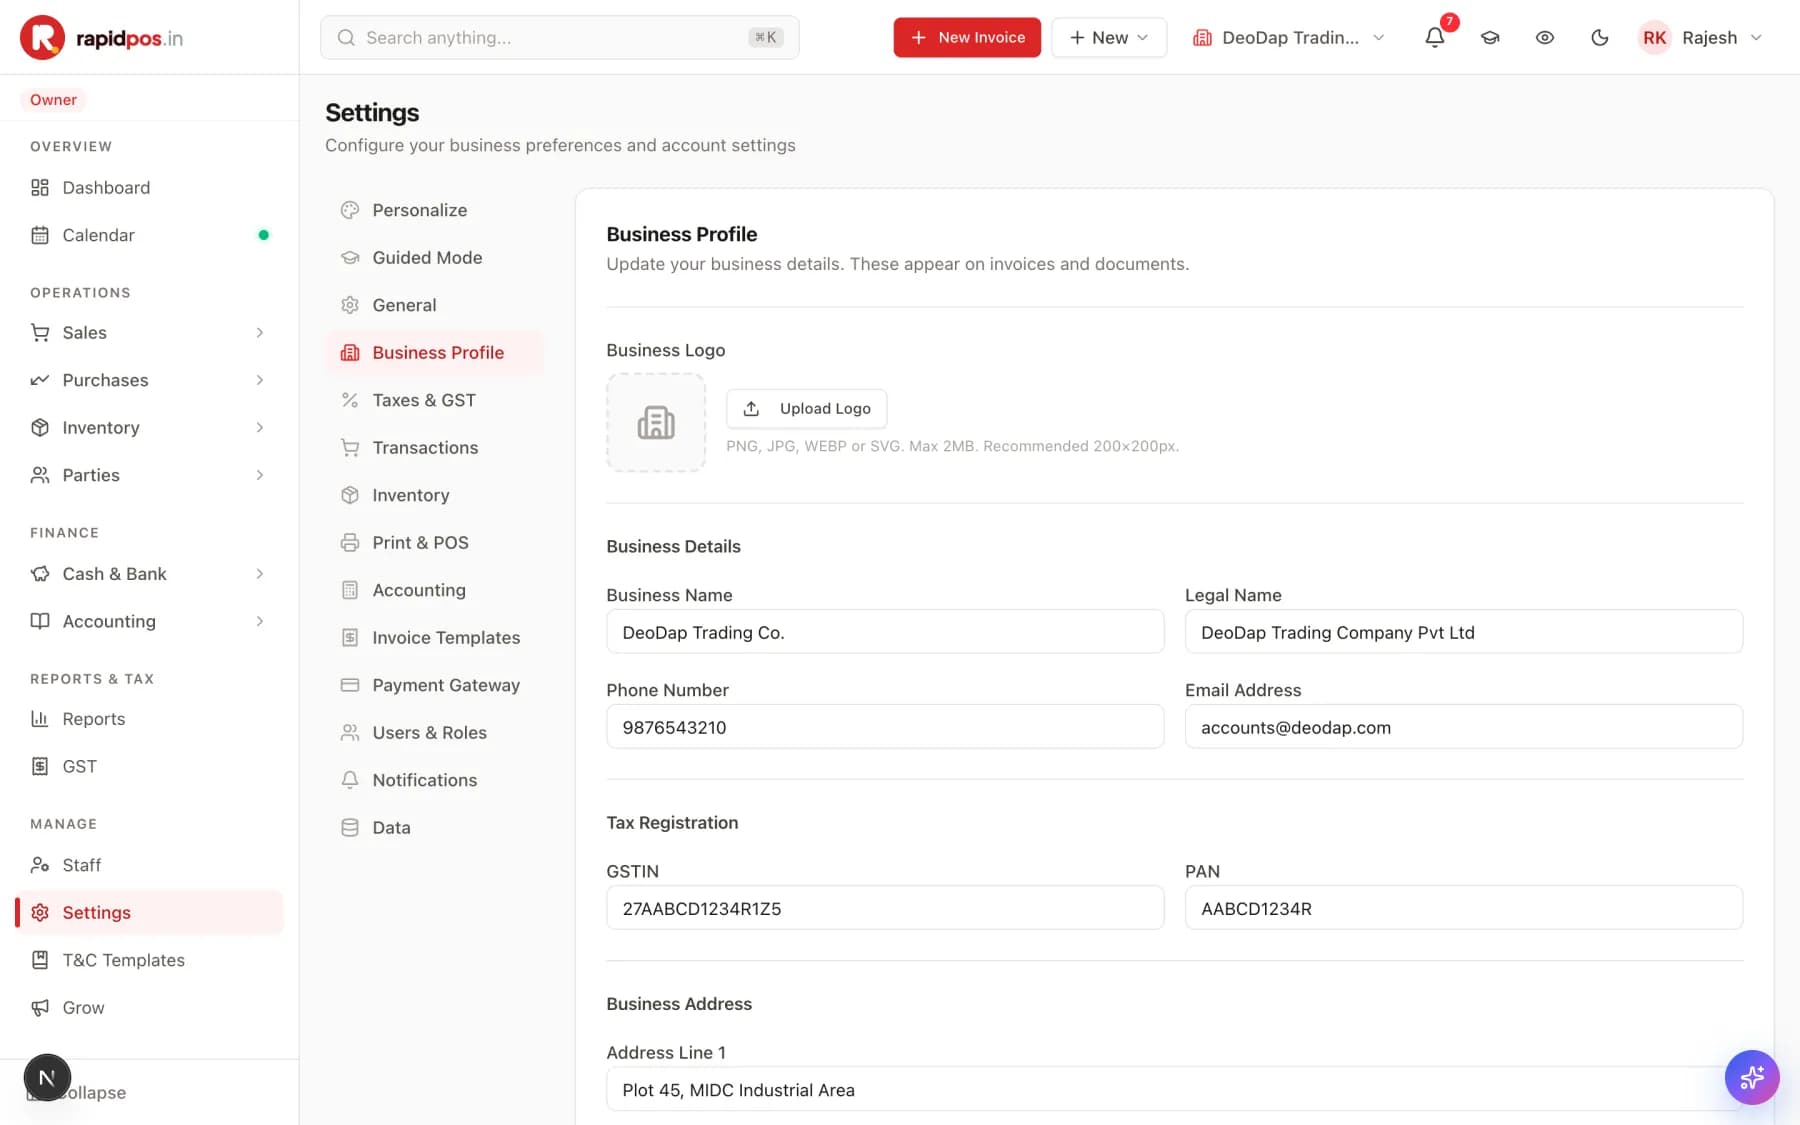
The Settings screen with a list of setting groups on the left (Personalize, General, Business Profile, Taxes & GST, Print & POS and more) and the Business Profile form on the right showing logo upload, business name, phone, email, GSTIN and PAN.
The Your business details screen in RapidPOS.

What this screen is for

Whatever you enter here is printed at the top of every invoice, quotation and receipt you ever send. Do this first, before you bill anybody.

What each button does

Upload Logo
Puts your shop logo on your invoices. PNG, JPG, WEBP or SVG, up to 2MB — around 200×200 pixels looks best.
Business Name
The trading name customers know you by. This is the big name on the invoice.
Legal Name
The registered company name, if it differs from the trading name.
GSTIN
Your GST number. Enter it and RapidPOS starts calculating GST and preparing your returns.
PAN
Your PAN, used on tax documents.
Taxes & GST (left list)
Sets your default GST rate and turns GST features on or off.
Print & POS (left list)
Chooses your invoice paper size and sets up thermal receipt printing for the counter.
Invoice Templates (left list)
Picks how your printed invoice looks.
Data (left list)
Where you export or clear business data.

Do it step by step

  1. Open Settings from the sidebar, then press Business Profile in the left list.
  2. Press Upload Logo and choose your shop logo.
  3. Fill in Business Name, Phone Number and Email Address.
  4. Enter your GSTIN and PAN if you are GST-registered.
  5. Fill in the full business address, including state — this decides whether a sale is CGST+SGST or IGST.
  6. Save, then open Taxes & GST and set your usual GST rate.
  7. Finally open Print & POS and pick your printer/paper size.

What happens after you press it

Every new invoice from now on carries these details automatically. You never re-type them.

Be careful

  • Get the State right. RapidPOS decides between CGST+SGST (same state) and IGST (different state) by comparing your state with the customer's. A wrong state means wrong tax on every bill.
  • Check the GSTIN character by character. A wrong GSTIN flows onto every invoice and into your GST returns.

Common mistakes to avoid

  • Skipping this screen and billing first. Then every early invoice prints without your logo, address and GST number — and printed bills cannot be un-sent.

Adding a product or service

Enter each thing you sell once, then bill it with one tap forever.

Inventory → Items → Add Item

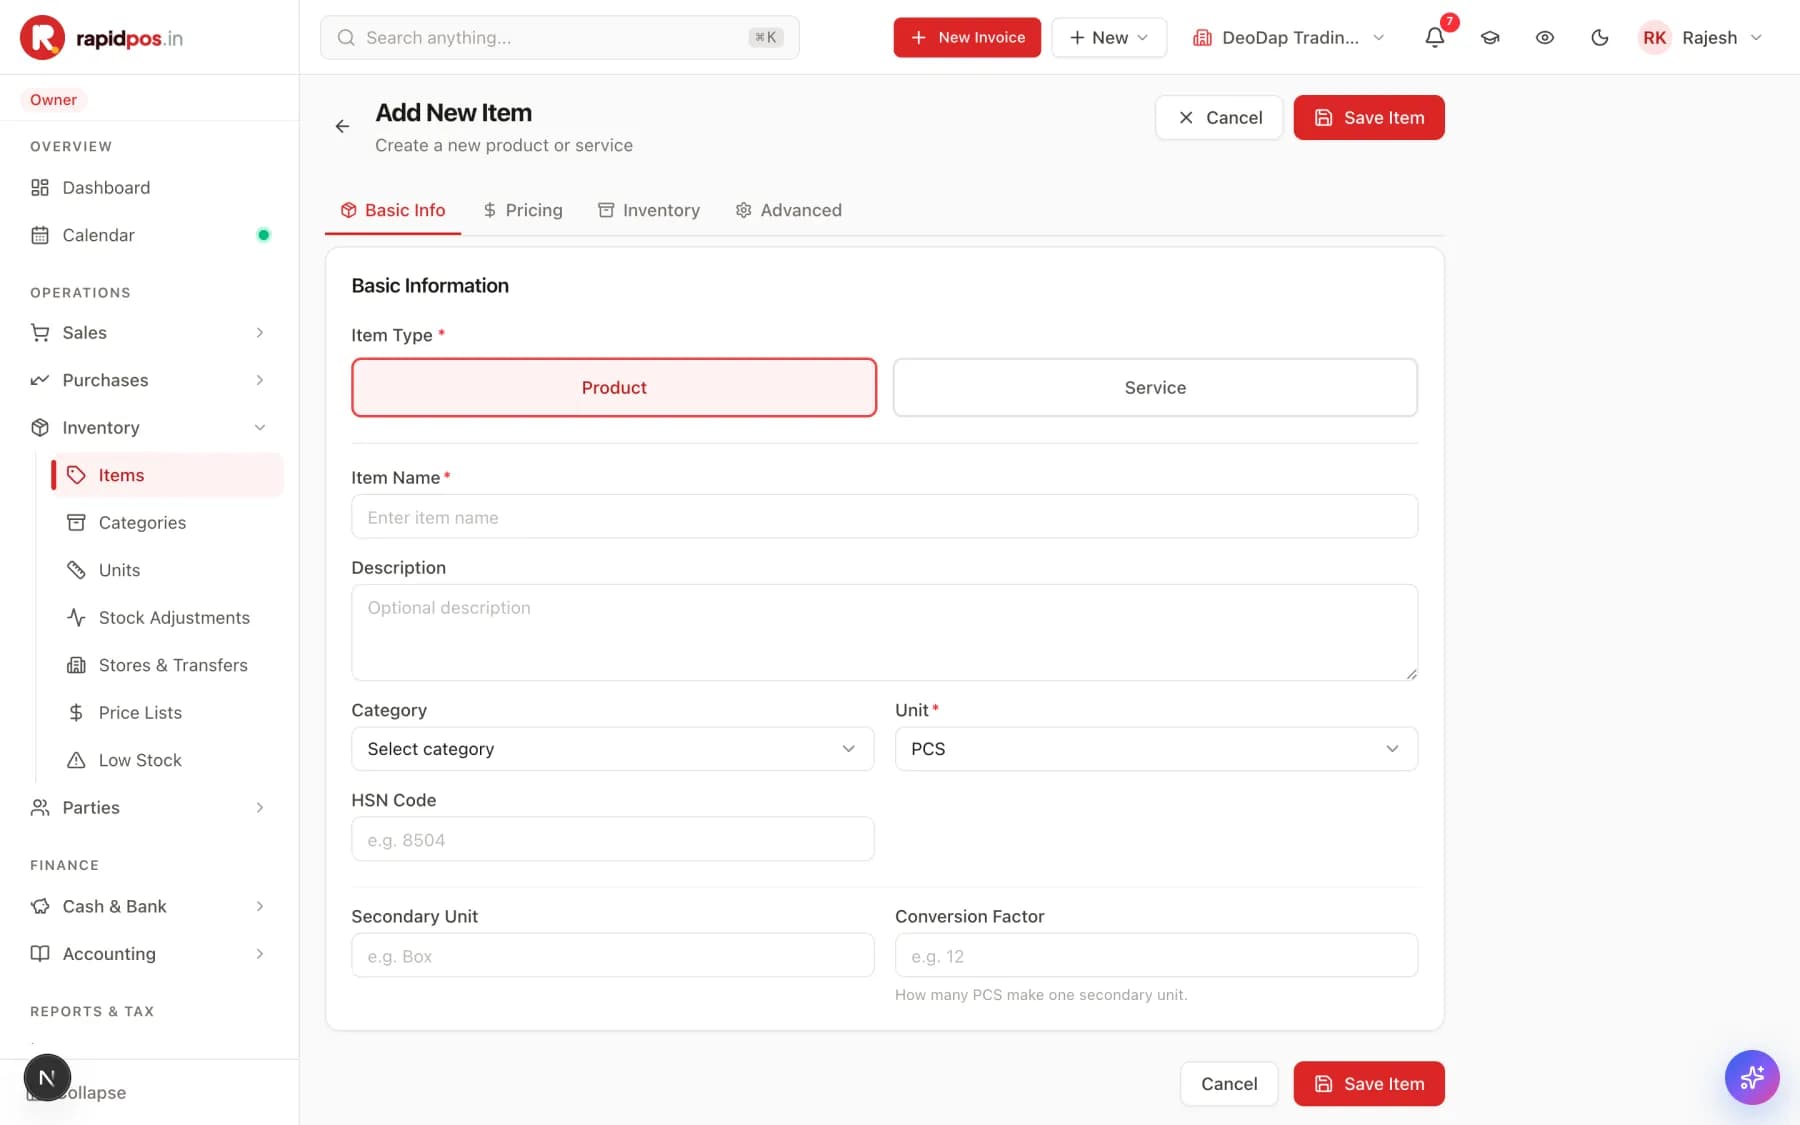
The Add New Item screen with Basic Info, Pricing, Inventory and Advanced tabs. The Basic Info tab shows a Product/Service switch, Item Name, Description, Category, Unit, HSN Code, Secondary Unit and Conversion Factor.
The Adding a product or service screen in RapidPOS.

What this screen is for

Builds your catalogue. Once an item is here, billing it is one tap — the price, unit and GST rate fill in by themselves.

What each button does

Product / Service
Product = something you keep stock of, and stock goes down when you sell it. Service = labour or a fee, with no stock tracking. Pick before you fill anything else in.
Item Name
What you and your staff will search for while billing. Required.
Category
Groups items so you can filter and report by category later.
Unit
How you sell it — PCS, KG, BOX and so on. Required.
HSN Code
The GST classification code for this item. It prints on the invoice and feeds your GST return.
Secondary Unit + Conversion Factor
For buying in one unit and selling in another — e.g. buy a BOX of 12, sell in PCS. Enter 12 as the factor.
Pricing tab
Sale price, purchase price and the GST rate for this item.
Inventory tab
Opening stock and the minimum level that triggers a low-stock alert.
Save Item
Saves it and returns you to the Items list. The item is immediately available for billing.

Do it step by step

  1. Go to Inventory → Items and press Add Item.
  2. Choose Product or Service.
  3. Type the Item Name and pick a Unit.
  4. Enter the HSN Code and choose a Category.
  5. Open the Pricing tab. Enter the Sale Price (what the customer pays) and the Purchase Price (what you paid). Set the GST rate.
  6. Open the Inventory tab. Enter your Opening Stock — how many you have on the shelf right now — and a Min Stock level.
  7. Press Save Item.

What happens after you press it

The item appears in the Items list and can be picked on any invoice or on the POS screen straight away.

Tips that save time

  • Set Min Stock on everything you re-order. That single number is what makes the Low Stock alert work.
  • Have a long list already? Do not type them one by one — use Utilities → Import Items to bring in a whole spreadsheet at once.
  • Enter the Purchase Price honestly. Your profit reports are only as accurate as this number.

Common mistakes to avoid

  • Creating the same item twice with slightly different spellings ('LED Monitor' and 'Led monitor 24'). Search before you add — duplicates split your stock and wreck your reports.
  • Marking something a Service when you do keep stock of it. Services never track stock, so your counts will never be right.
  • Leaving Opening Stock at zero for goods you already have. Your stock value will read zero until you fix it.

The Items list

Everything you sell, with live stock and prices.

Inventory → Items

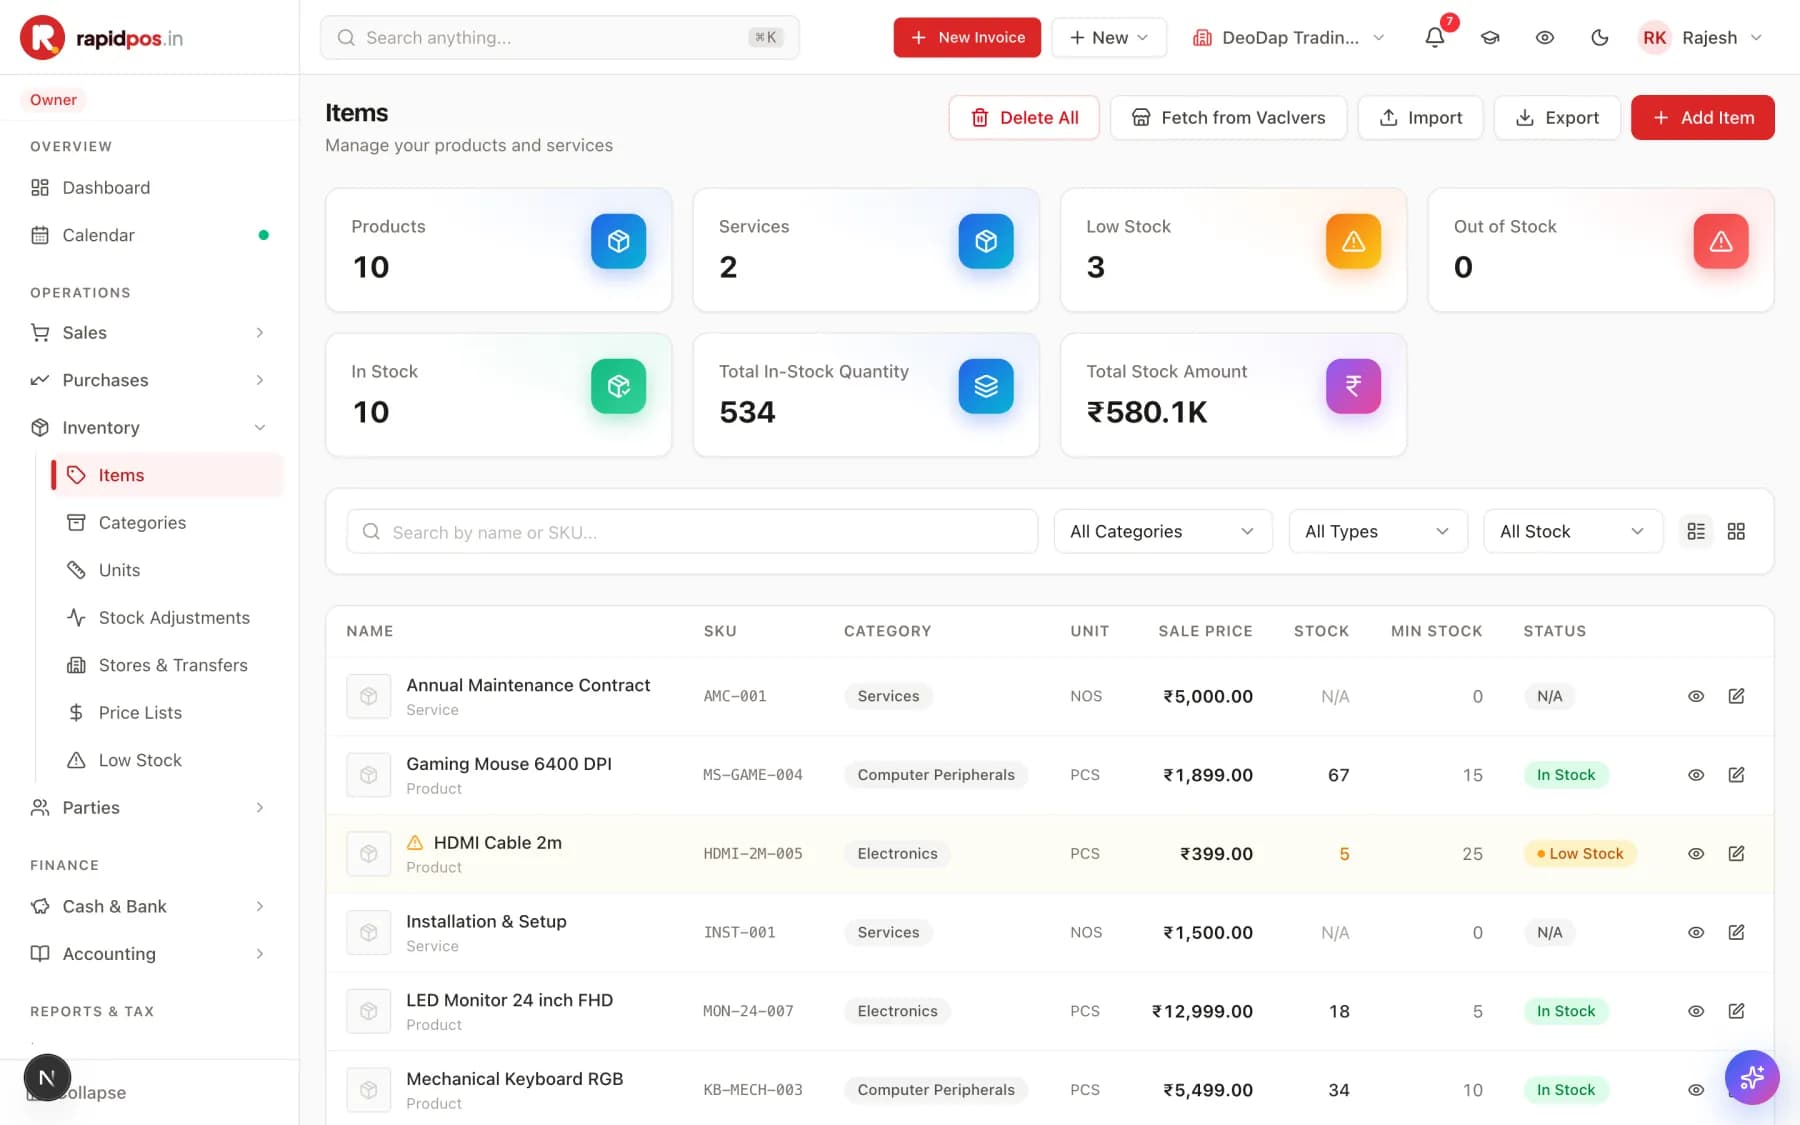
The Items screen with summary cards for Products, Services, Low Stock, Out of Stock, In Stock, Total In-Stock Quantity and Total Stock Amount, above a searchable table of items with SKU, category, unit, sale price, stock and status.
The The Items list screen in RapidPOS.

What this screen is for

Your whole catalogue in one table, with what is in stock and what it is worth. This is where you come to change a price or check a count.

What each button does

Add Item
Creates a new product or service.
Import
Brings in many items at once from a CSV/Excel file.
Export
Downloads your item list as a file — handy as a price list or a backup.
Search by name or SKU
Finds an item instantly. Faster than scrolling.
All Categories / All Types / All Stock
Filters the table — for example, show only Low Stock items.
Eye icon (row)
Opens the item to view its full details and history.
Pencil icon (row)
Edits the item — this is how you change a price.
Delete All
Deletes your ENTIRE item catalogue. There is no undo.

Do it step by step

  1. Open Inventory → Items.
  2. Read the cards along the top for a quick position: how many products, how many are low, and your Total Stock Amount.
  3. Type in the search box to find any item.
  4. Press the pencil icon on a row to change its price or details, then save.

Tips that save time

  • The Low Stock card is a shortcut to your re-ordering list — press through to see exactly what to buy.
  • Total Stock Amount is your stock valued at purchase cost. It is the number your accountant will ask for.

Be careful

  • Delete All removes every item in the business and cannot be undone. Never press it to 'clean up' a few rows — delete those rows individually with the row actions instead.

Common mistakes to avoid

  • Changing an item's price to fix one bill. Editing the price here changes it for FUTURE bills only. To correct a bill that is already saved, edit that invoice.

Customers and suppliers

The people you sell to and buy from, each with a running balance.

Parties → Customers · Parties → Suppliers

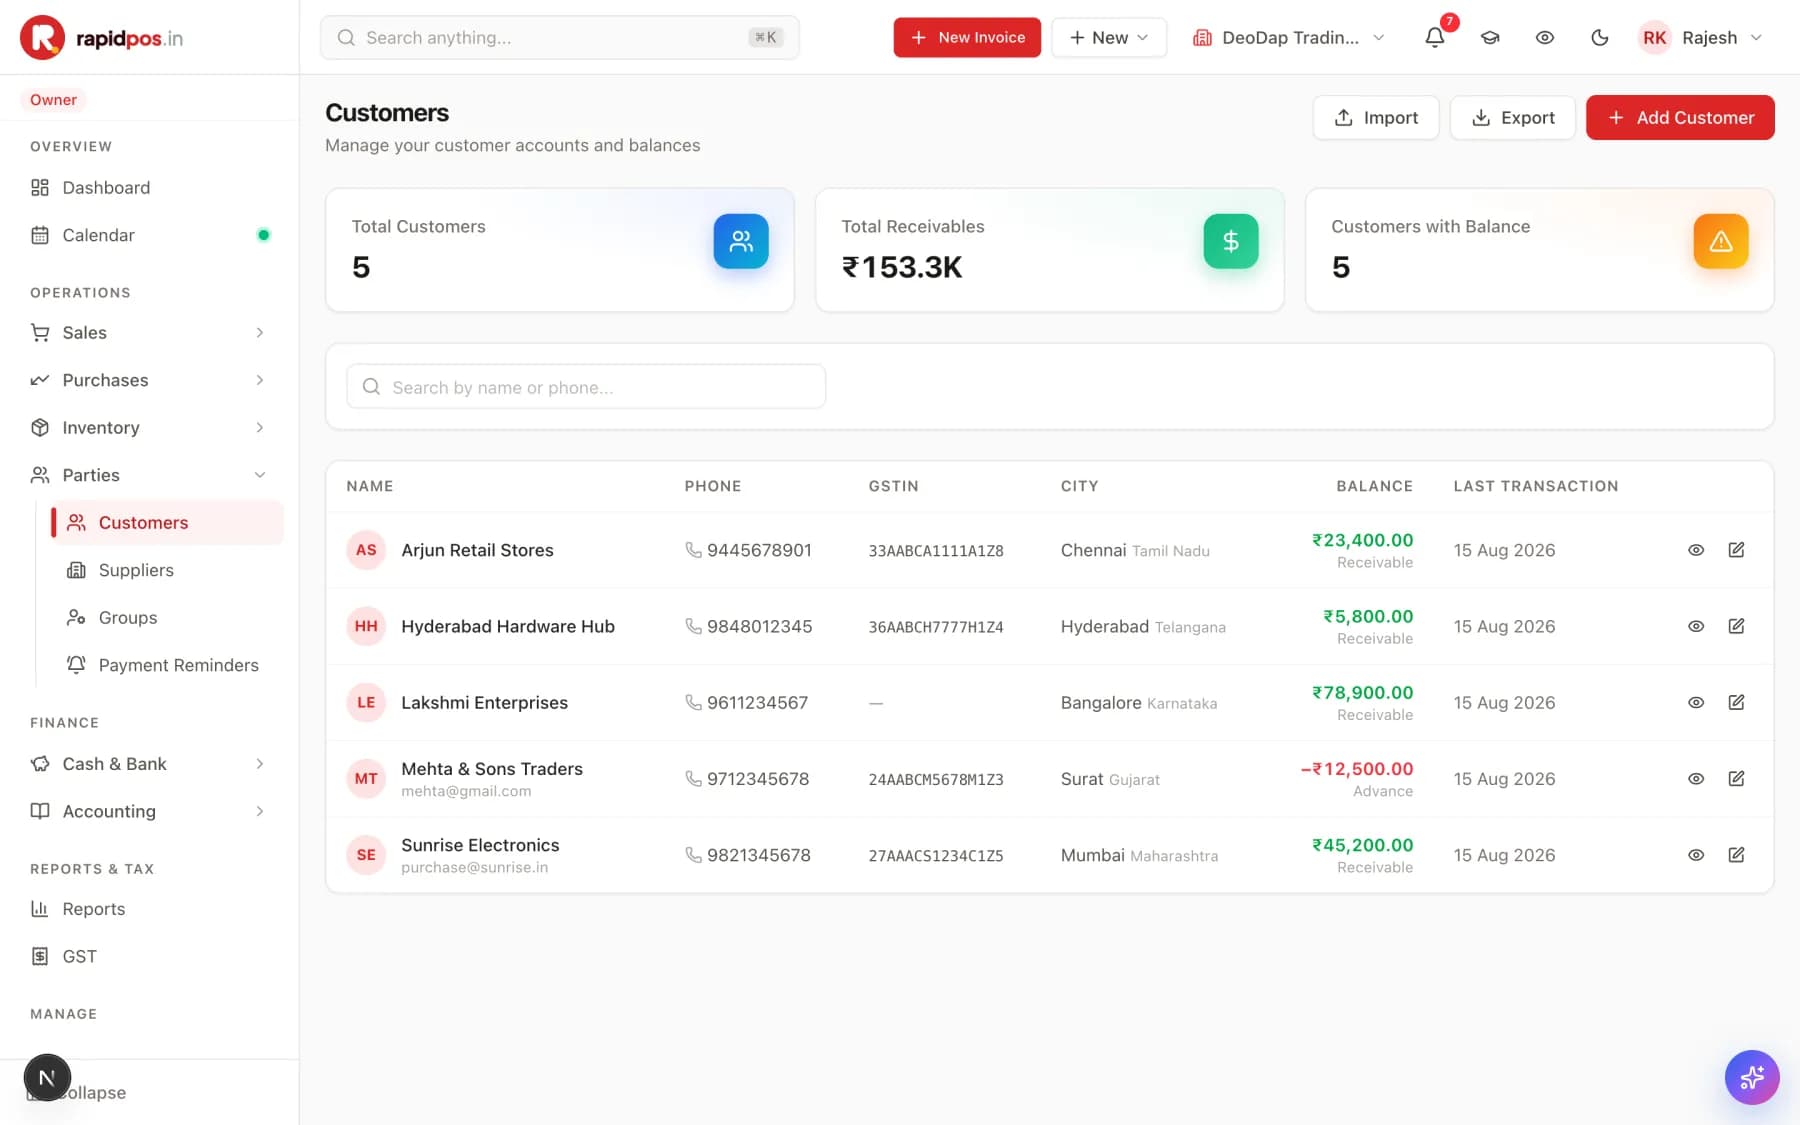
The Customers screen with cards for Total Customers, Total Receivables and Customers with Balance, above a table listing each customer's phone, GSTIN, city, balance and last transaction date.
The Customers and suppliers screen in RapidPOS.

What this screen is for

Every customer and supplier lives here with a running balance, so you always know who owes you and whom you owe. RapidPOS calls them 'parties'.

What each button does

Add Customer
Creates a new customer. Suppliers are added the same way under Parties → Suppliers.
Import
Brings in your whole contact list from a spreadsheet in one go.
Export
Downloads your customer list with balances.
Balance column
Green 'Receivable' means they owe you. Red 'Advance' means they have paid you ahead and you owe them goods.
Eye icon (row)
Opens that customer's statement — every bill and payment, with a running balance.
Pencil icon (row)
Edits their name, phone, GSTIN or address.

Do it step by step

  1. Open Parties → Customers and press Add Customer.
  2. Enter their name and phone number — phone matters, because that is how you send the bill on WhatsApp.
  3. Enter their GSTIN and state if they are a GST-registered business.
  4. If they already owe you from before RapidPOS, enter that as the opening balance.
  5. Save. Repeat under Parties → Suppliers for the people you buy from.

What happens after you press it

The customer is now selectable on invoices, and their balance updates automatically every time you bill them or they pay.

Tips that save time

  • Always add the phone number. Without it you cannot WhatsApp the invoice, and payment reminders will not work.
  • The state you enter here decides CGST+SGST versus IGST on their bills — so it must be their real state.
  • For a walk-in customer who will pay cash and leave, you do not need to create a party at all — just bill them on the POS screen.

Common mistakes to avoid

  • Creating a fresh customer for every visit ('Ramesh', 'Ramesh 2'). Their history and balance get split across the duplicates. Search first.
  • Entering a customer as a supplier. Customers are people you SELL to; suppliers are people you BUY from.

Selling every day

Two ways to bill: a full GST invoice, or the fast counter screen.

Creating a GST invoice

The full bill — for credit sales, businesses and anything that needs a proper document.

Sales → Invoices → New Invoice

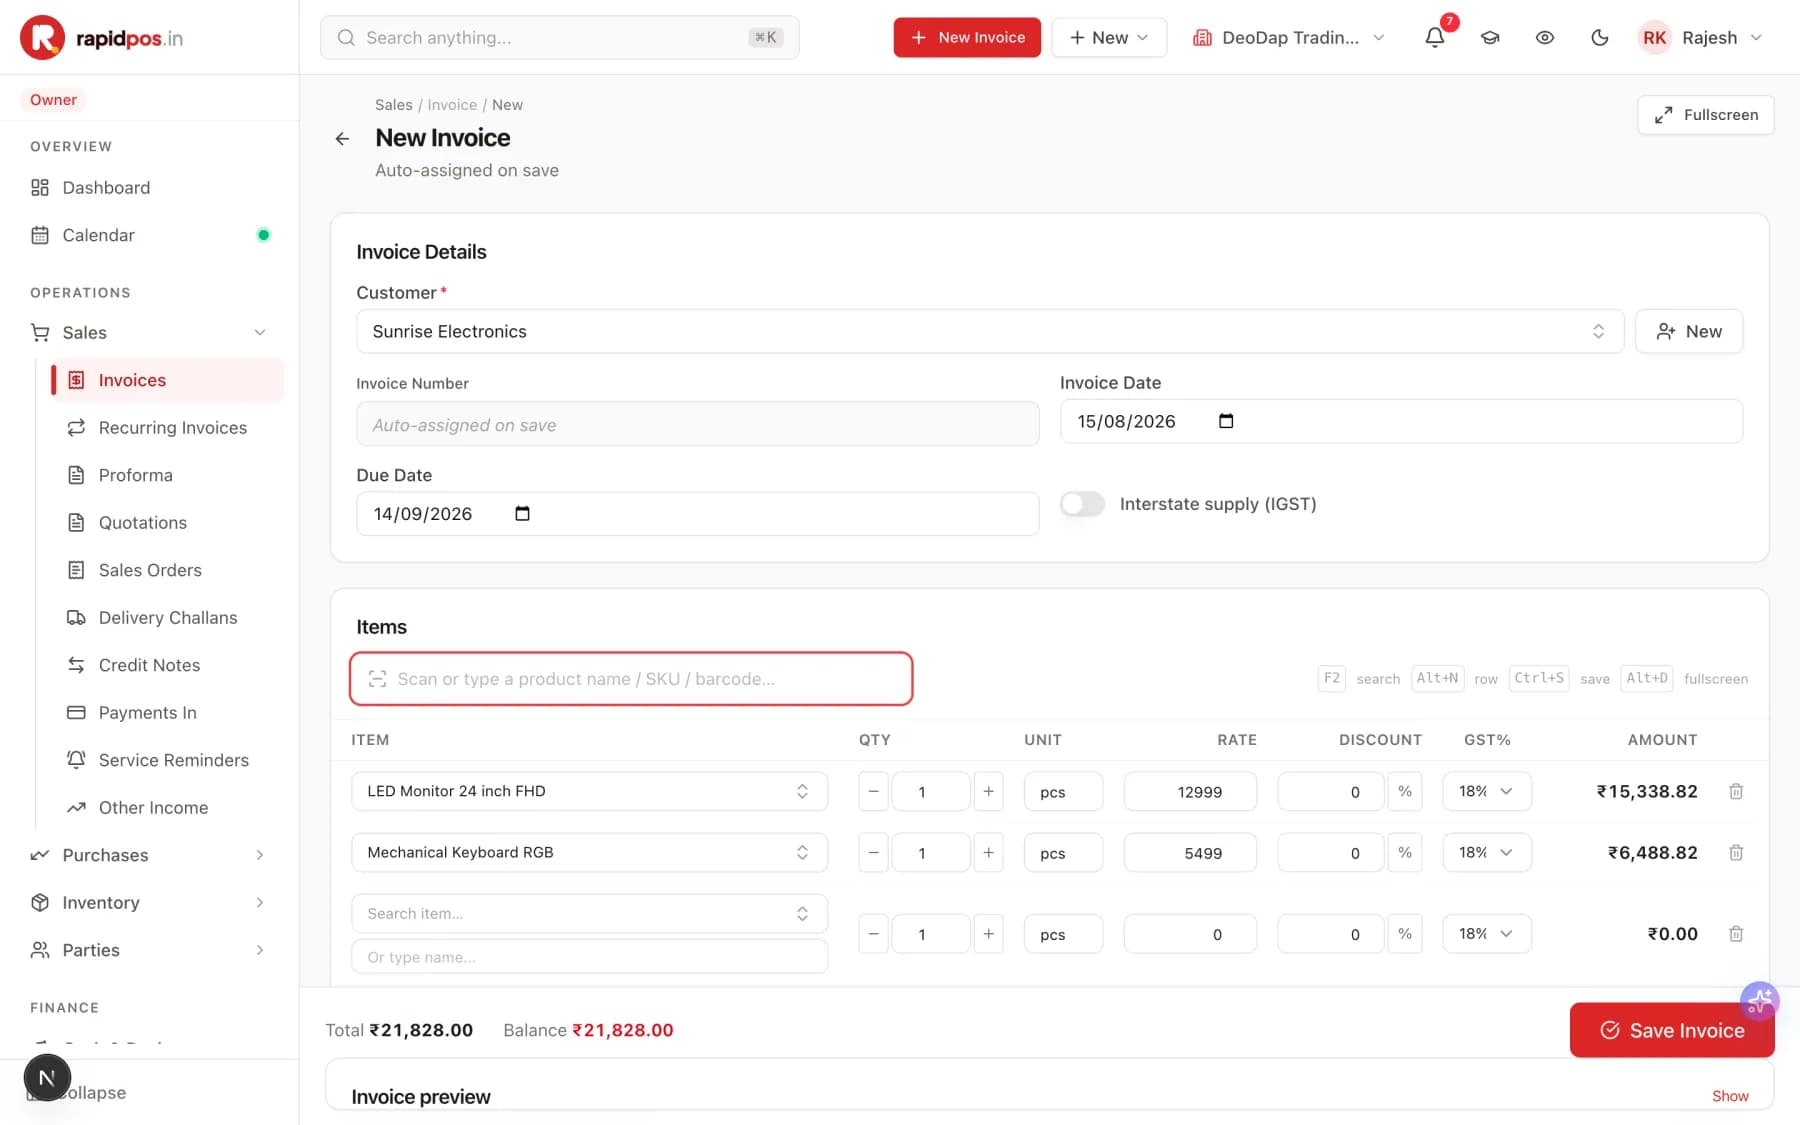
The New Invoice screen with a customer selected, invoice and due dates, an Interstate supply toggle, and an items table containing two products with quantity, rate, discount, GST percentage and amount columns. A Save Invoice button sits in the bottom bar.
The Creating a GST invoice screen in RapidPOS.

What this screen is for

Creates a proper GST invoice for a customer. Use this when the sale is on credit, when the customer is a business, or when they need a document with their GSTIN on it.

What each button does

Customer
Who you are billing. Required. Start typing to search your customer list.
New (beside Customer)
Adds a brand-new customer without leaving the invoice.
Invoice Number
Left alone deliberately — RapidPOS assigns the next number in sequence when you save.
Invoice Date
The date of the sale. Defaults to today. This is the date that decides which GST return the bill lands in.
Due Date
When payment is expected. After this date the invoice is flagged Overdue.
Interstate supply (IGST)
Switches the tax from CGST+SGST to IGST. RapidPOS sets this for you from the customer's state — only touch it if you know it is wrong.
Scan or type a product name / SKU / barcode
The fastest way to add a line. Scan a barcode, or type a name and press Enter.
QTY / RATE / DISCOUNT / GST%
Editable on every line. The AMOUNT column and the totals recalculate as you type.
Add Row
Adds another blank item line by hand.
Trash icon (row)
Removes that line from the invoice.
Save Invoice
Saves the bill, assigns its number, reduces stock, and updates the customer's balance.

Do it step by step

  1. Go to Sales → Invoices and press New Invoice.
  2. Pick the Customer. If they are new, press New and add them on the spot.
  3. Check the Invoice Date and set a Due Date.
  4. Click the scan box and type the product name, then press Enter. The line fills in with the price, unit and GST rate you set up earlier.
  5. Repeat for each product. Change QTY on any line if they are buying more than one.
  6. Add a discount on a line, or a whole-bill discount lower down, if you are giving one.
  7. Check the Total in the bottom bar.
  8. Press Save Invoice.

What happens after you press it

The invoice gets its number, your stock drops by the quantity sold, the customer's balance goes up by the amount, and the sale appears in your GST return for that month. You are taken to the saved invoice, where you can print or share it.

Tips that save time

  • Keyboard shortcuts are shown on the screen: F2 to search items, Alt+N for a new row, Ctrl+S to save, Alt+D for full screen.
  • Press Show on the Invoice preview at the bottom to see exactly what the customer will receive before you save.
  • Recording the payment at the same time — if they pay immediately — saves you a separate trip to Payments In.

Be careful

  • Do not change the Invoice Date to an earlier month to 'fix' something. It moves the sale into a GST return you may have already filed.

Common mistakes to avoid

  • Typing a product name straight into the row instead of picking it from the list. A typed name is not a catalogue item, so it does not reduce stock and does not appear in item reports.
  • Forgetting to check quantity. The line defaults to 1, and a bill for 1 instead of 10 is the single most common billing error.
  • Saving with the wrong customer selected. Check the name at the top before you press Save.

Printing and sharing an invoice

What to do once the bill is saved.

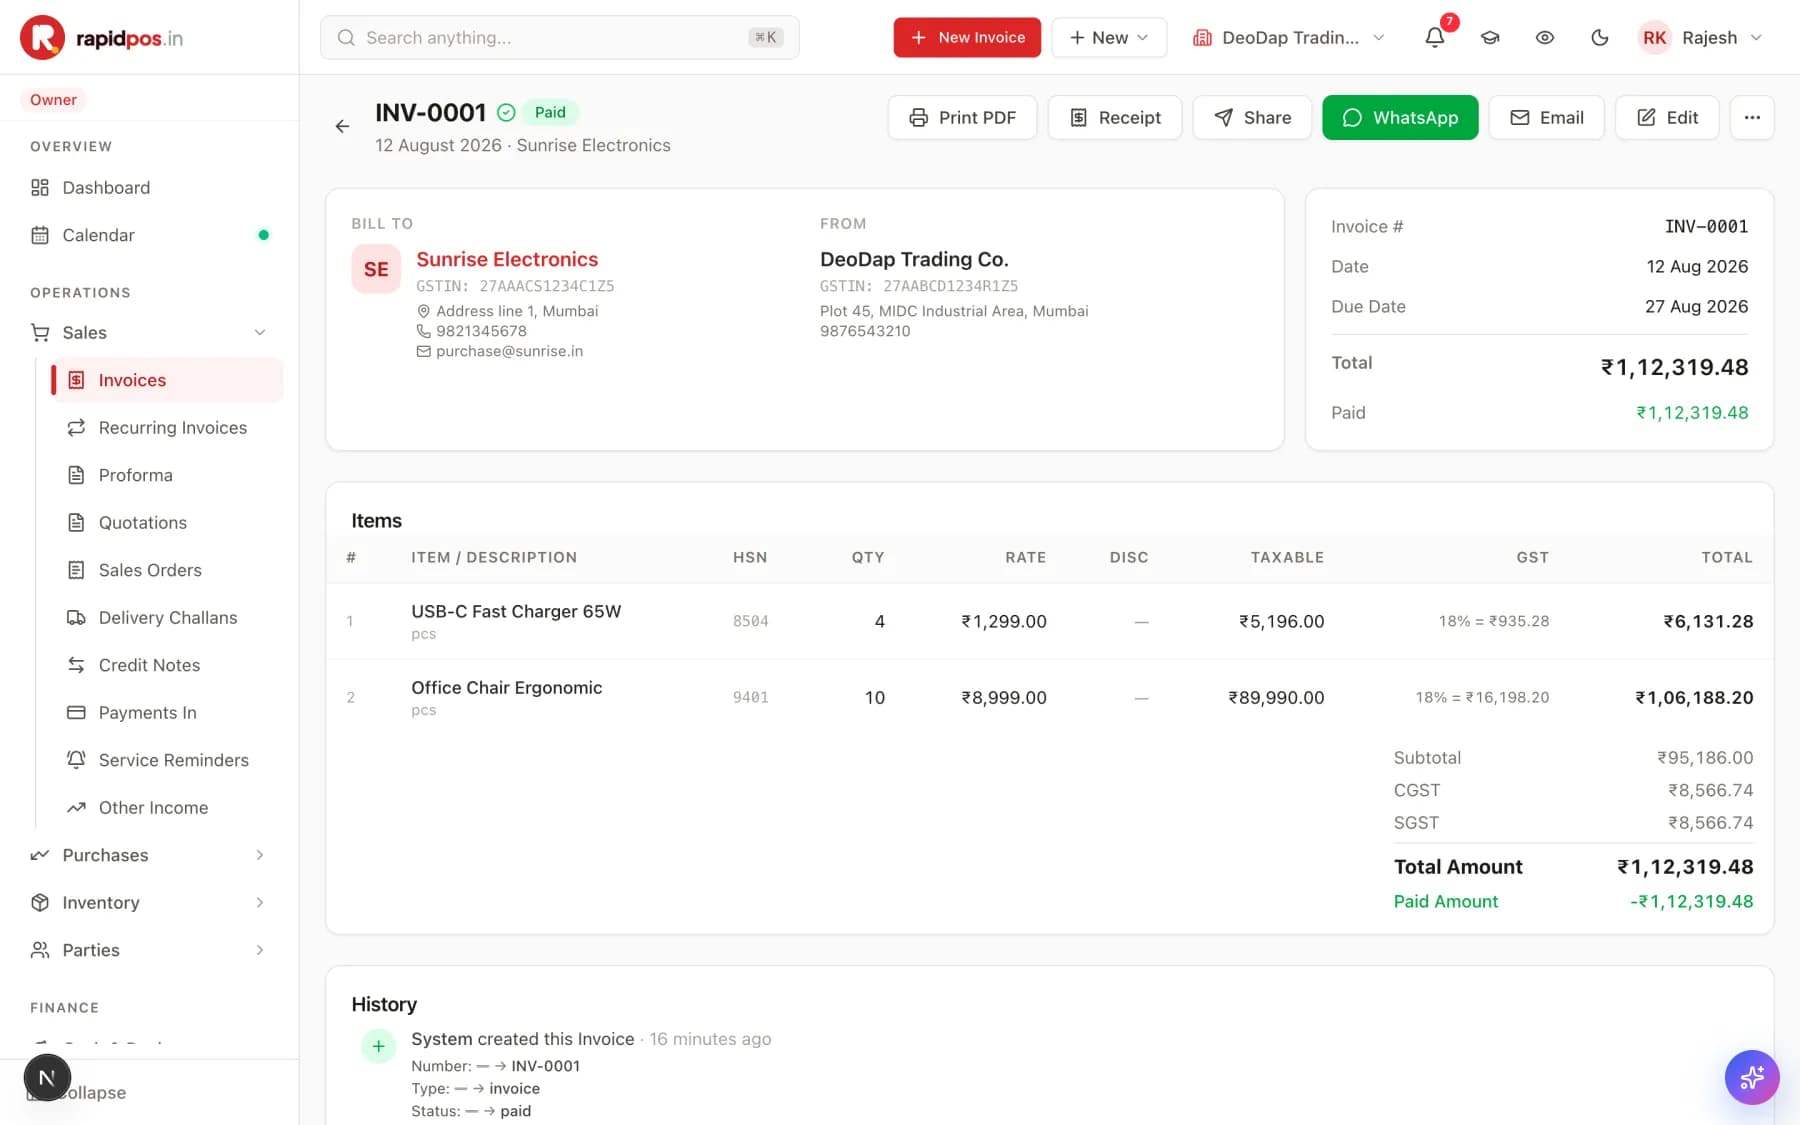
Sales → Invoices → click any invoice number

A saved invoice INV-0001 marked Paid, with Print PDF, Receipt, Share, WhatsApp, Email and Edit buttons across the top, billing details, an items table with HSN and GST columns, a totals block and a History timeline.
The Printing and sharing an invoice screen in RapidPOS.

What this screen is for

The saved invoice. From here you send it to the customer, print it, or correct it.

What each button does

Print PDF
Opens the full A4 invoice and sends it to your printer, or saves it as a PDF file.
Receipt
Prints the small thermal receipt instead — the till-roll format for a counter printer.
Share
Gives you a link to the invoice you can paste anywhere.
WhatsApp
Opens WhatsApp with the invoice ready to send to the customer's saved number.
Email
Emails the invoice to the address on the customer's record.
Edit
Reopens the invoice for changes. Stock and balances are recalculated when you save again.
History (bottom)
A permanent record of who created or changed this invoice and when. You cannot edit it.

Do it step by step

  1. Open Sales → Invoices and click the invoice number.
  2. Check the totals block: Subtotal, CGST/SGST or IGST, Total Amount and Paid Amount.
  3. Press WhatsApp to send it to the customer instantly, or Print PDF for a paper copy.

Tips that save time

  • WhatsApp is the fastest way to get paid — the customer has the bill on their phone before they leave.
  • The status chip beside the invoice number (Paid / Pending / Partial / Overdue) is calculated from payments received. You never set it by hand — record the payment and the status follows.

Be careful

  • Editing an invoice the customer already has creates a mismatch between your copy and theirs. Re-send it after any change.

Common mistakes to avoid

  • Deleting an invoice to cancel a sale. For a GST-registered business the correct way to reverse a sale is a Credit Note (Sales → Credit Notes), which leaves an audit trail your returns can explain.

Tracking your invoices

Who has paid, who has not, and who is late.

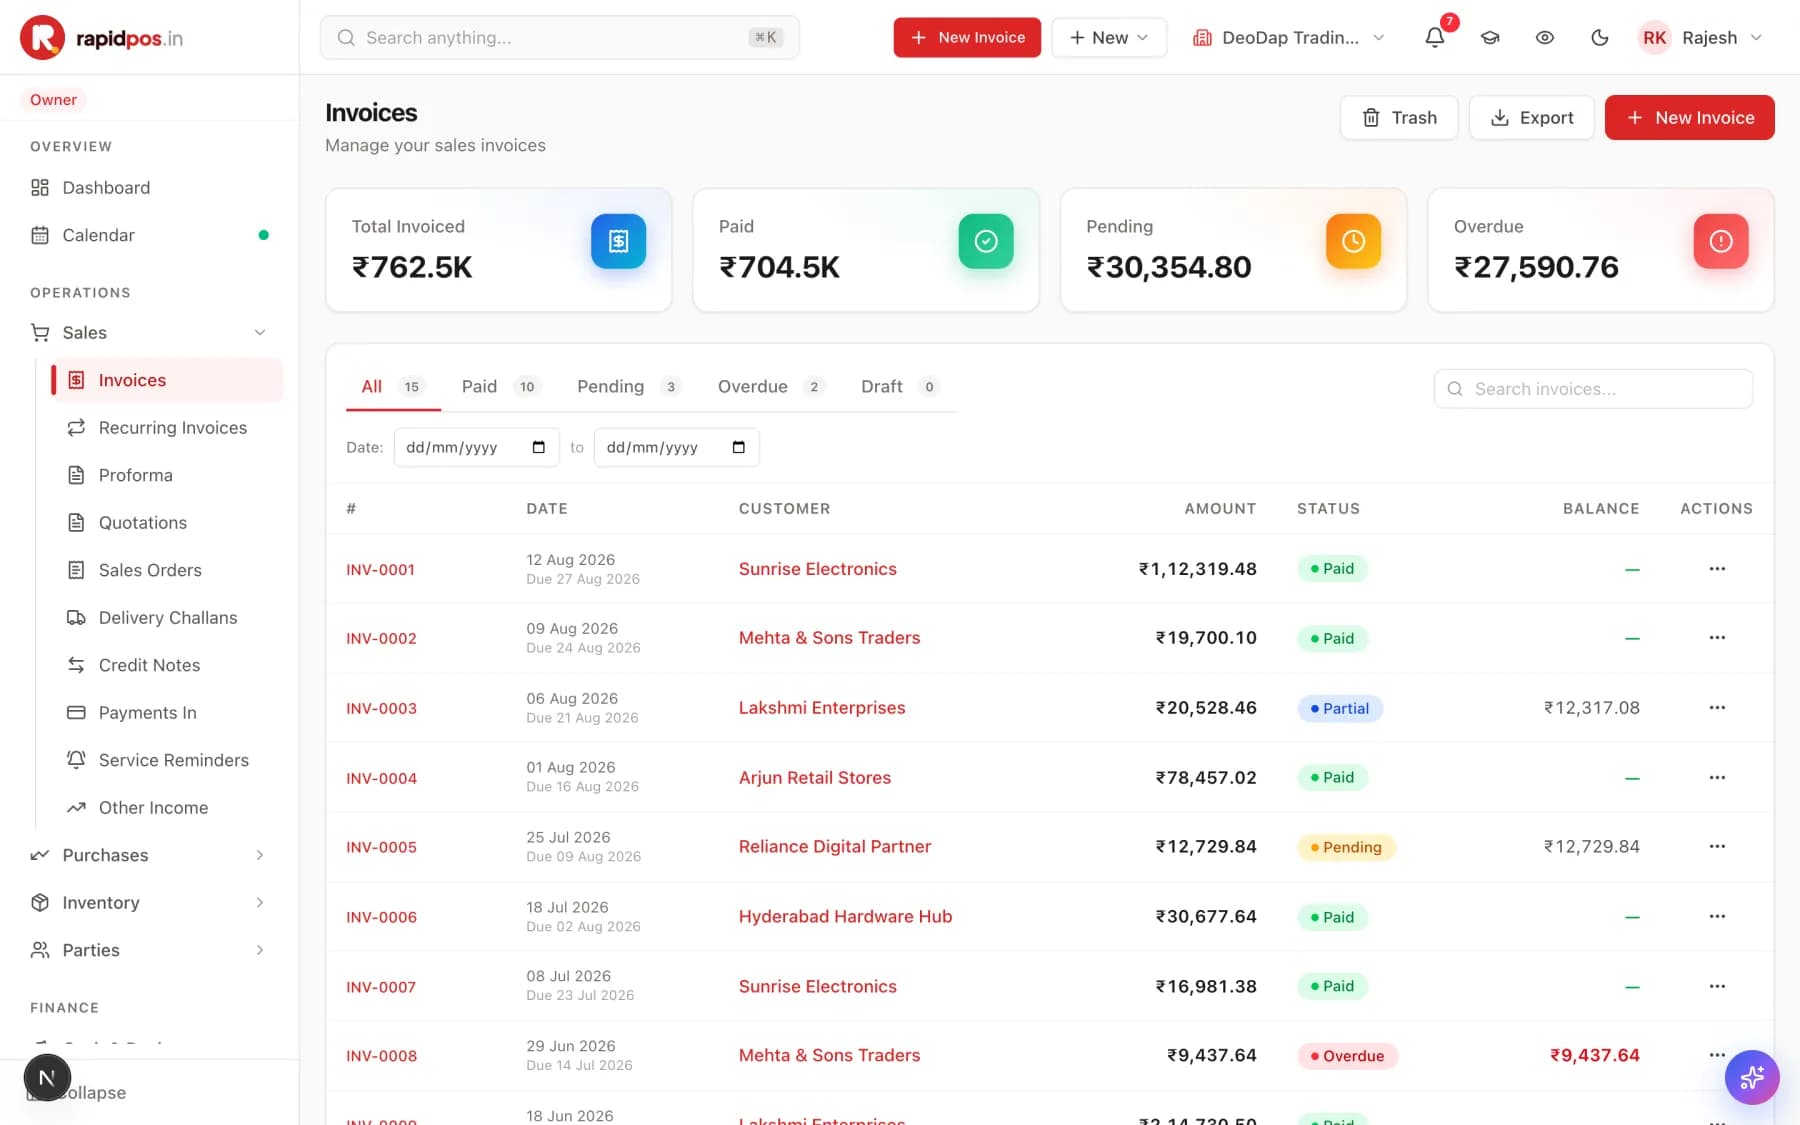
Sales → Invoices

The Invoices list with cards for Total Invoiced, Paid, Pending and Overdue, status tabs (All, Paid, Pending, Overdue, Draft), a date filter, and a table of invoices with customer, amount, status and balance.
The Tracking your invoices screen in RapidPOS.

What this screen is for

Every sales invoice in one list, grouped by whether it has been paid. This is your collections screen.

What each button does

All / Paid / Pending / Overdue / Draft tabs
Filters the list. The number on each tab is how many invoices are in it.
Overdue tab
The one that matters — bills past their due date. Work this list every week.
Date range
Narrows the list to bills raised between two dates.
Search invoices
Finds a bill by number or customer name.
Balance column
How much is still unpaid on that invoice. A dash means fully paid.
… (row actions)
Per-invoice actions — view, edit, record a payment, print or share.
Export
Downloads the list as a file for your accountant.
Trash
Shows invoices that have been deleted.

Do it step by step

  1. Open Sales → Invoices.
  2. Press the Overdue tab.
  3. Call every customer in that list, starting with the largest Balance.
  4. When someone pays, press … on their row and record the payment.

Tips that save time

  • Do this once a week at a fixed time. Overdue money is the most common reason a profitable shop runs out of cash.
  • Parties → Payment Reminders can send the chase message on WhatsApp for you.

Fast billing at the counter (POS)

For a queue of customers — scan, take cash, print, next.

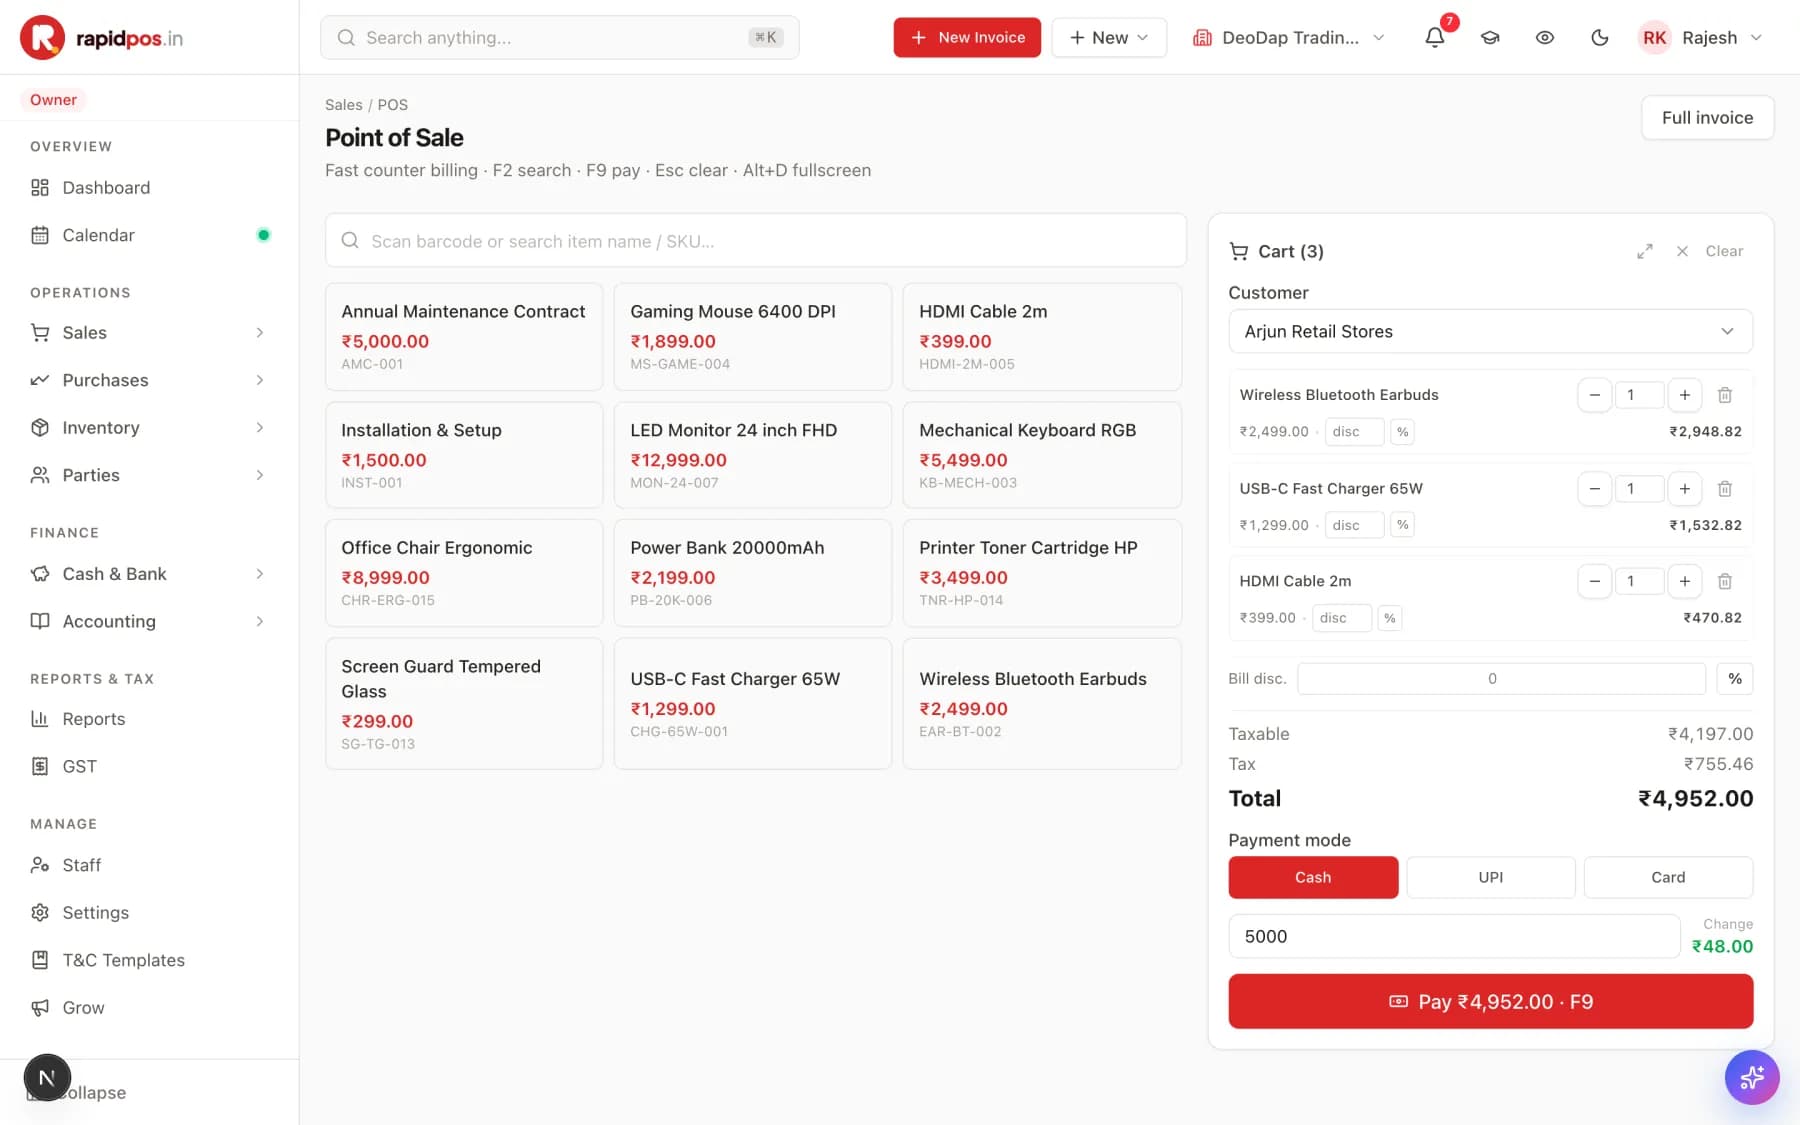
Sales → POS

The Point of Sale screen with a large barcode search box, a grid of item tiles showing prices, and a cart panel on the right listing three items with quantities, a total of ₹4,952.00, Cash/UPI/Card payment buttons, a cash-received box showing change of ₹48.00 and a Pay button.
The Fast billing at the counter (POS) screen in RapidPOS.

What this screen is for

A stripped-down billing screen built for speed. Use it for walk-in customers who pay and leave. It creates a real invoice behind the scenes — it is not a separate, lesser record.

What each button does

Scan barcode or search item name / SKU
The main box. Scan a barcode and the item drops into the cart instantly; or type a few letters and pick from the list.
Item tiles
Tap any tile to add that item to the cart. Good for a touchscreen and for items with no barcode.
Customer
Optional here. Leave it for a cash walk-in; set it if the sale should go on someone's account.
− and + on a cart line
Changes quantity without typing.
Trash icon on a cart line
Removes that line.
disc / %
A discount on that one line — as an amount or a percentage.
Bill disc.
A discount on the whole bill.
Cash / UPI / Card
How the customer is paying. Pick before you take the money.
Cash received
Type what the customer handed over and RapidPOS shows the Change to give back.
Pay
Completes the sale: saves the invoice, reduces stock, records the payment and prints the receipt.
Clear
Empties the cart and starts over.
Full invoice
Moves this cart to the full invoice screen if the customer suddenly wants a proper GST bill.

Do it step by step

  1. Open Sales → POS.
  2. Scan each item, or tap its tile. Watch the cart on the right fill up.
  3. Adjust quantities with − and + if needed.
  4. Choose the payment mode: Cash, UPI or Card.
  5. For cash, type what they gave you in Cash received — the Change figure appears on the right.
  6. Press Pay. The receipt prints and the screen clears for the next customer.

What happens after you press it

A numbered invoice is created, stock drops, the payment is recorded as received, and the cart empties ready for the next customer.

Tips that save time

  • Learn three keys and you will never touch the mouse: F2 to search, F9 to pay, Esc to clear.
  • Alt+D goes full screen and hides the menus — ideal for a dedicated till.
  • POS sales appear in Sales → Invoices like any other bill, so your reports and GST returns include them automatically.

Be careful

  • Clear wipes the whole cart with no undo. If you only need to remove one item, use the trash icon on that line.

Common mistakes to avoid

  • Pressing Pay before selecting the right payment mode. The sale is recorded against whichever mode was highlighted, and your cash and bank figures will not match reality.
  • Using POS for a credit sale without setting a customer. With no customer there is nobody to chase for the money.

Money in and money out

Recording what you receive and what you spend. Skip this and your profit figure is fiction.

Recording money received

Marking invoices as paid, and watching receivables shrink.

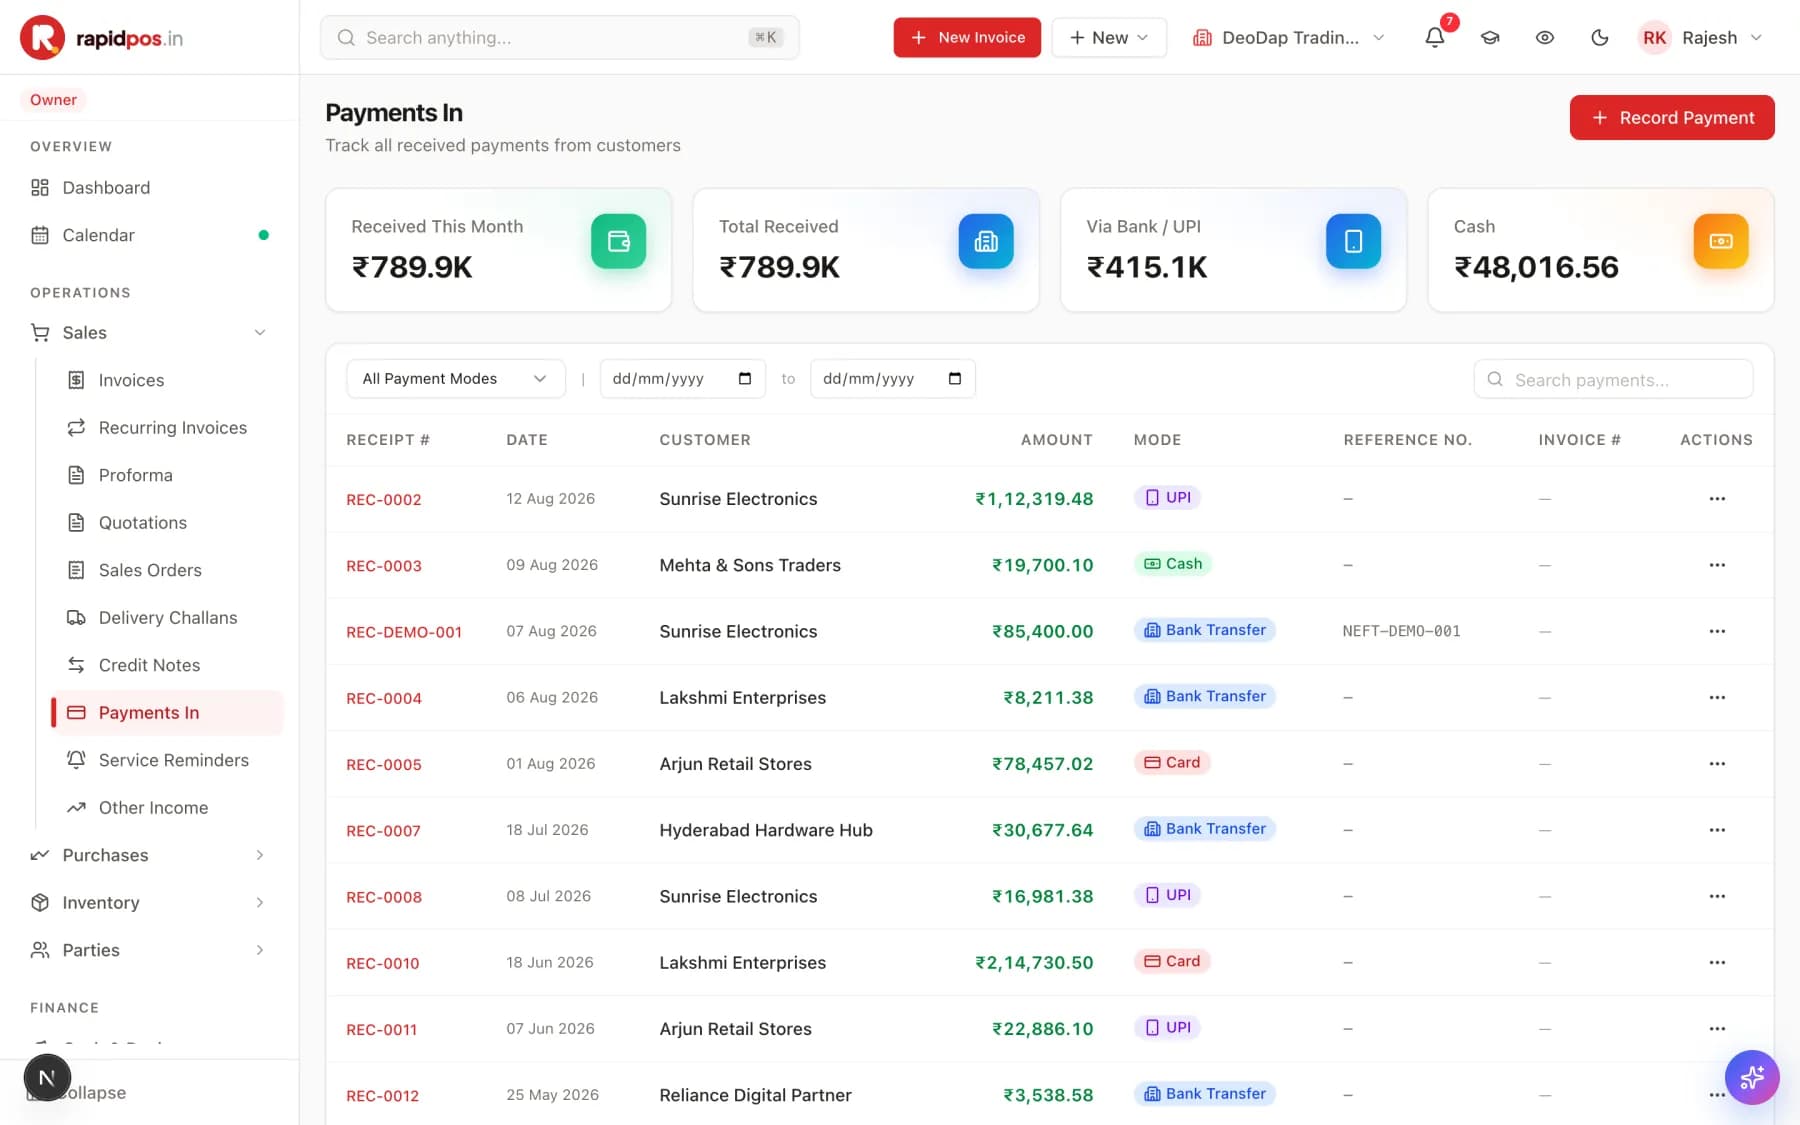
Sales → Payments In

The Payments In screen with cards for Received This Month, Total Received, Via Bank/UPI and Cash, above a table of receipts showing date, customer, amount, payment mode and reference number.
The Recording money received screen in RapidPOS.

What this screen is for

Every rupee a customer pays you gets recorded here. This is what turns an invoice from Pending to Paid and shrinks your receivables.

What each button does

Record Payment
Opens the form to log money received. Pick the customer, the amount, the mode, and the invoice it settles.
All Payment Modes
Filters the list by Cash, UPI, Card or Bank Transfer.
Date range
Shows only payments received between two dates — use it to reconcile a day or a month.
MODE column
How each payment arrived. Cash affects Cash in Hand; the rest affect your bank balance.
REFERENCE NO.
Where you store the UPI reference or cheque number, so you can match it against your bank statement later.

Do it step by step

  1. Open Sales → Payments In and press Record Payment.
  2. Choose the customer.
  3. Enter the amount they paid.
  4. Choose the payment mode: Cash, UPI, Card or Bank Transfer.
  5. Link it to the invoice it settles.
  6. Add the UPI or cheque reference number.
  7. Save.

What happens after you press it

The invoice's status changes to Paid or Partial, the customer's balance drops, and your cash or bank balance rises — all at once.

Tips that save time

  • Record payments the day they arrive. A week's backlog makes every figure on your Dashboard wrong.
  • A customer paying part of a bill is normal — enter the part amount and the invoice shows as Partial with the balance still owing.

Common mistakes to avoid

  • Recording a payment without linking it to an invoice. The money shows up in your cash, but the invoice still reads Pending and you will chase a customer who has already paid.
  • Choosing Cash when the money actually came by UPI. Your Cash in Hand will not match the notes in the drawer.

Recording a purchase

Goods bought from a supplier — this is what puts stock ON your shelf.

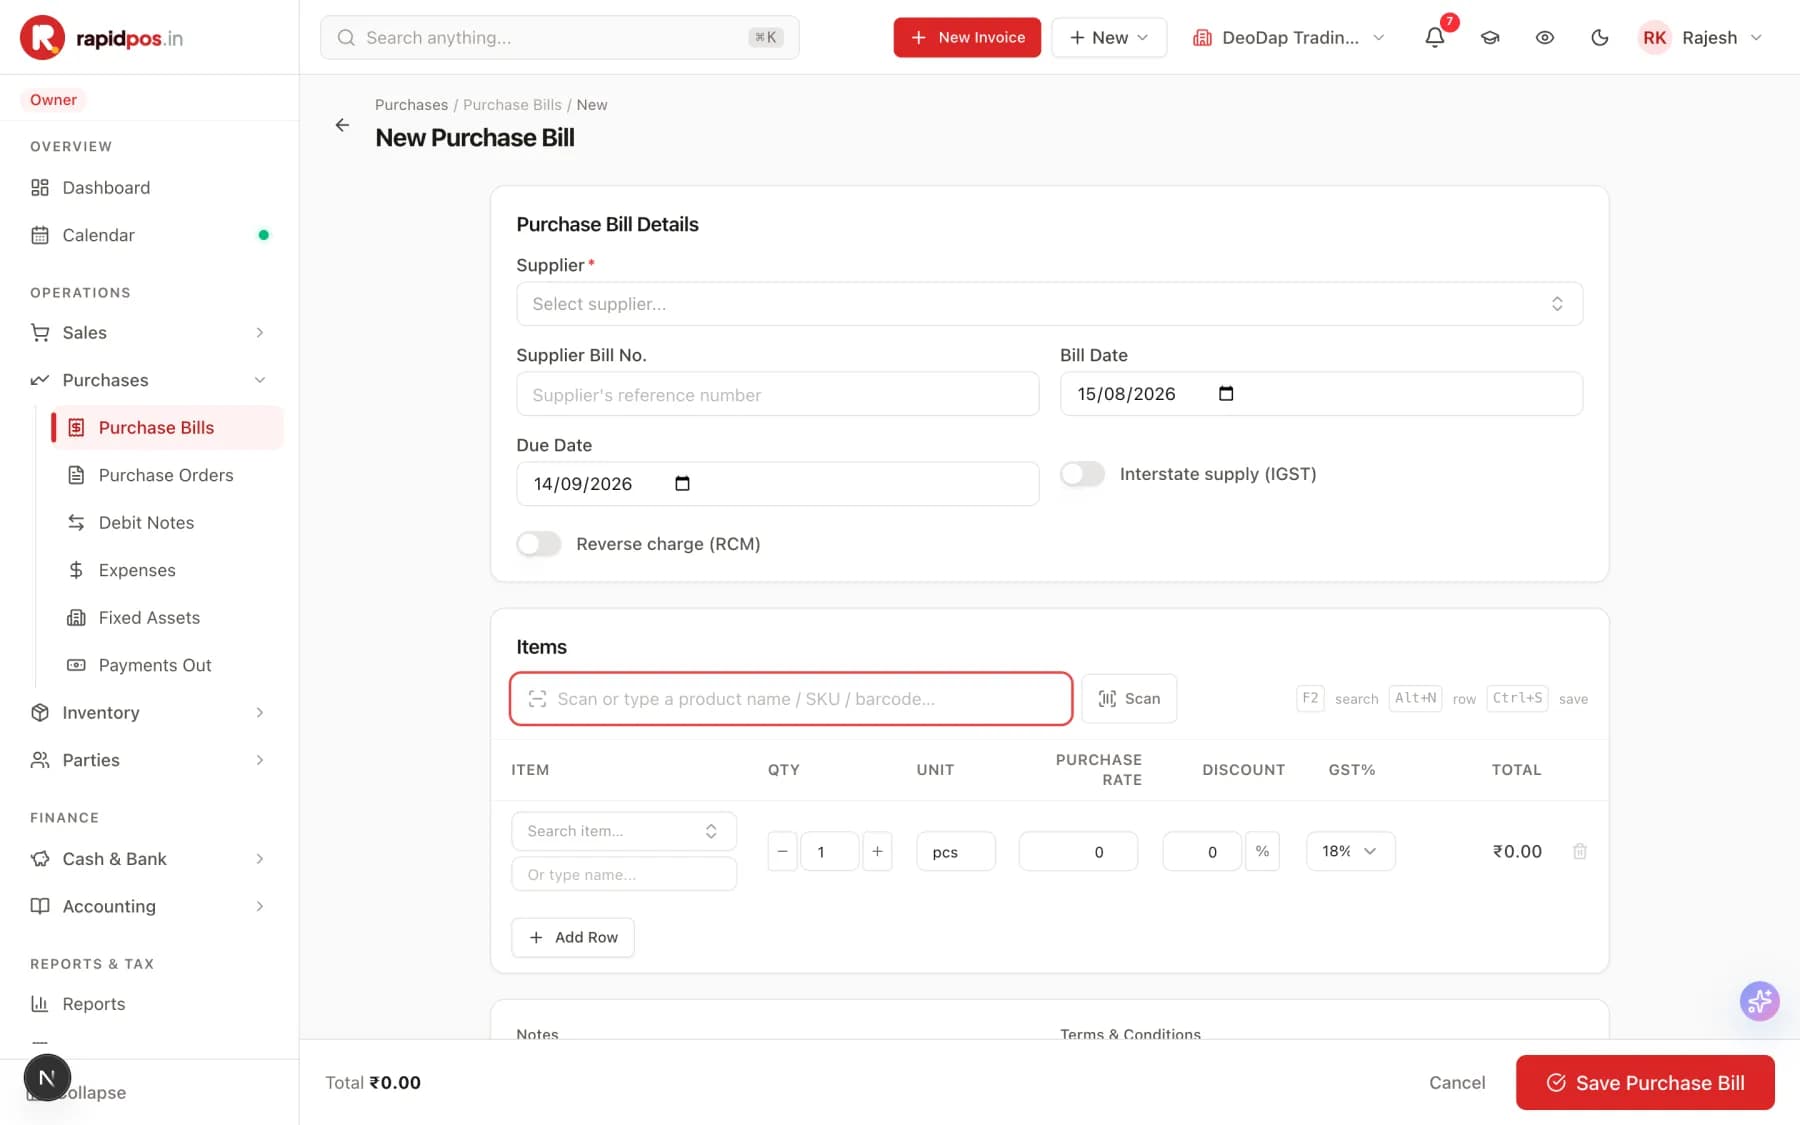
Purchases → Purchase Bills → New Purchase Bill

The New Purchase Bill screen with supplier, supplier bill number, bill date and due date fields, Interstate supply and Reverse charge toggles, and an items table with purchase rate, discount and GST columns.
The Recording a purchase screen in RapidPOS.

What this screen is for

Records goods you bought. It increases your stock, records what you owe the supplier, and claims your GST input credit.

What each button does

Supplier
Who you bought from. Required.
Supplier Bill No.
The number printed on THEIR bill, not yours. Enter it so you can match paperwork later.
Bill Date
The date on the supplier's bill. Use their date, not today's.
Due Date
When you have to pay them.
Reverse charge (RCM)
Only for purchases where you pay the GST instead of the supplier. Leave it off unless your accountant told you otherwise.
Scan / search box
Adds the items you bought, the same way as on an invoice.
PURCHASE RATE
What you paid per unit — not your selling price. This is what your profit is calculated against.
Save Purchase Bill
Saves it: stock goes up, and the supplier's balance goes up by what you owe.

Do it step by step

  1. Go to Purchases → Purchase Bills and press New Purchase Bill.
  2. Choose the Supplier.
  3. Type their bill number into Supplier Bill No. and set the Bill Date to match their bill.
  4. Add each item you received, with the quantity.
  5. Enter the Purchase Rate from their bill and the GST rate they charged.
  6. Check the Total matches the supplier's bill exactly.
  7. Press Save Purchase Bill.

What happens after you press it

Stock increases by the quantities entered, the supplier's balance rises by the amount, and the GST becomes claimable input credit in your return.

Tips that save time

  • Enter the purchase BEFORE you start selling those goods, or you will be selling stock the system does not know you have.
  • When you pay the supplier, record it under Purchases → Payments Out.

Be careful

  • If the total does not match the supplier's bill, stop and find the difference. A mismatch here quietly corrupts your stock value, your profit and your GST input claim.

Common mistakes to avoid

  • Entering the selling price in the Purchase Rate column. Every profit figure becomes meaningless — it will look like you make nothing.
  • Using today's date instead of the supplier's bill date, which pushes the input credit into the wrong GST period.

Recording expenses

Rent, salaries, electricity — everything you spend that is not stock.

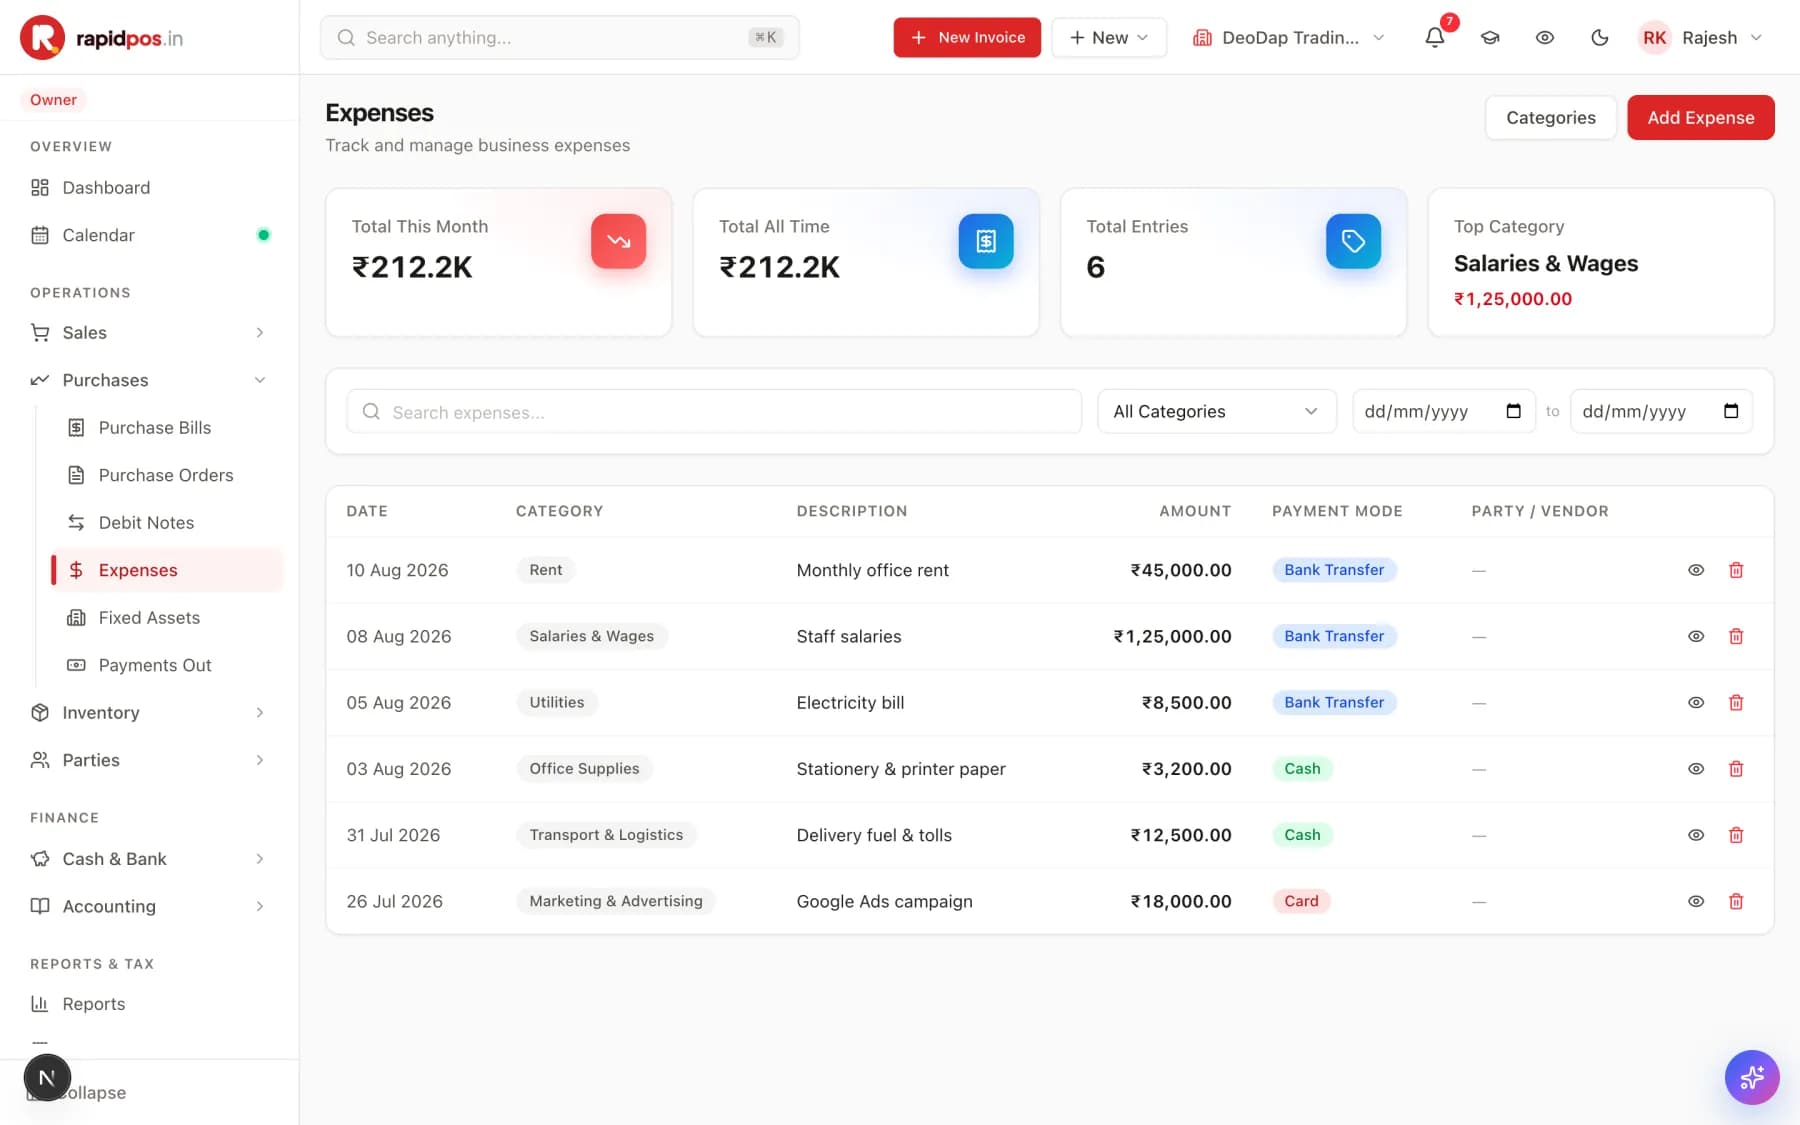
Purchases → Expenses

The Expenses screen with cards for Total This Month, Total All Time, Total Entries and Top Category, above a table of expenses with date, category, description, amount and payment mode.
The Recording expenses screen in RapidPOS.

What this screen is for

Running costs that are not goods for resale. Without these your Net Profit is wrong — it will look far higher than it really is.

What each button does

Add Expense
Records a new expense: date, category, description, amount and how you paid.
Categories
Manages your expense categories — Rent, Salaries & Wages, Utilities, Transport and so on.
All Categories filter
Shows one type of spending at a time.
Top Category card
Where most of your money is going. Usually the first place to cut costs.
Eye icon (row)
Opens the expense to see its full detail.
Trash icon (row)
Deletes the expense.

Do it step by step

  1. Open Purchases → Expenses and press Add Expense.
  2. Pick the date the money was actually spent.
  3. Choose a Category — create one via the Categories button if nothing fits.
  4. Write a short Description you will still understand in six months ('Electricity bill — August').
  5. Enter the Amount and the payment mode.
  6. Save.

What happens after you press it

The expense immediately reduces your Net Profit on the Dashboard and appears in your P&L statement.

Tips that save time

  • Enter expenses weekly. It takes five minutes and it is the difference between a real profit figure and a guess.
  • Use consistent categories. Ten variations of 'misc' tell you nothing at year end.

Common mistakes to avoid

  • Recording stock purchases here instead of as a Purchase Bill. Expenses do not add stock — your shelf count will be wrong.
  • Skipping small cash expenses. They add up to a large hole between your book profit and the cash in the drawer.

Cash and bank

What is in the drawer and what is in the bank.

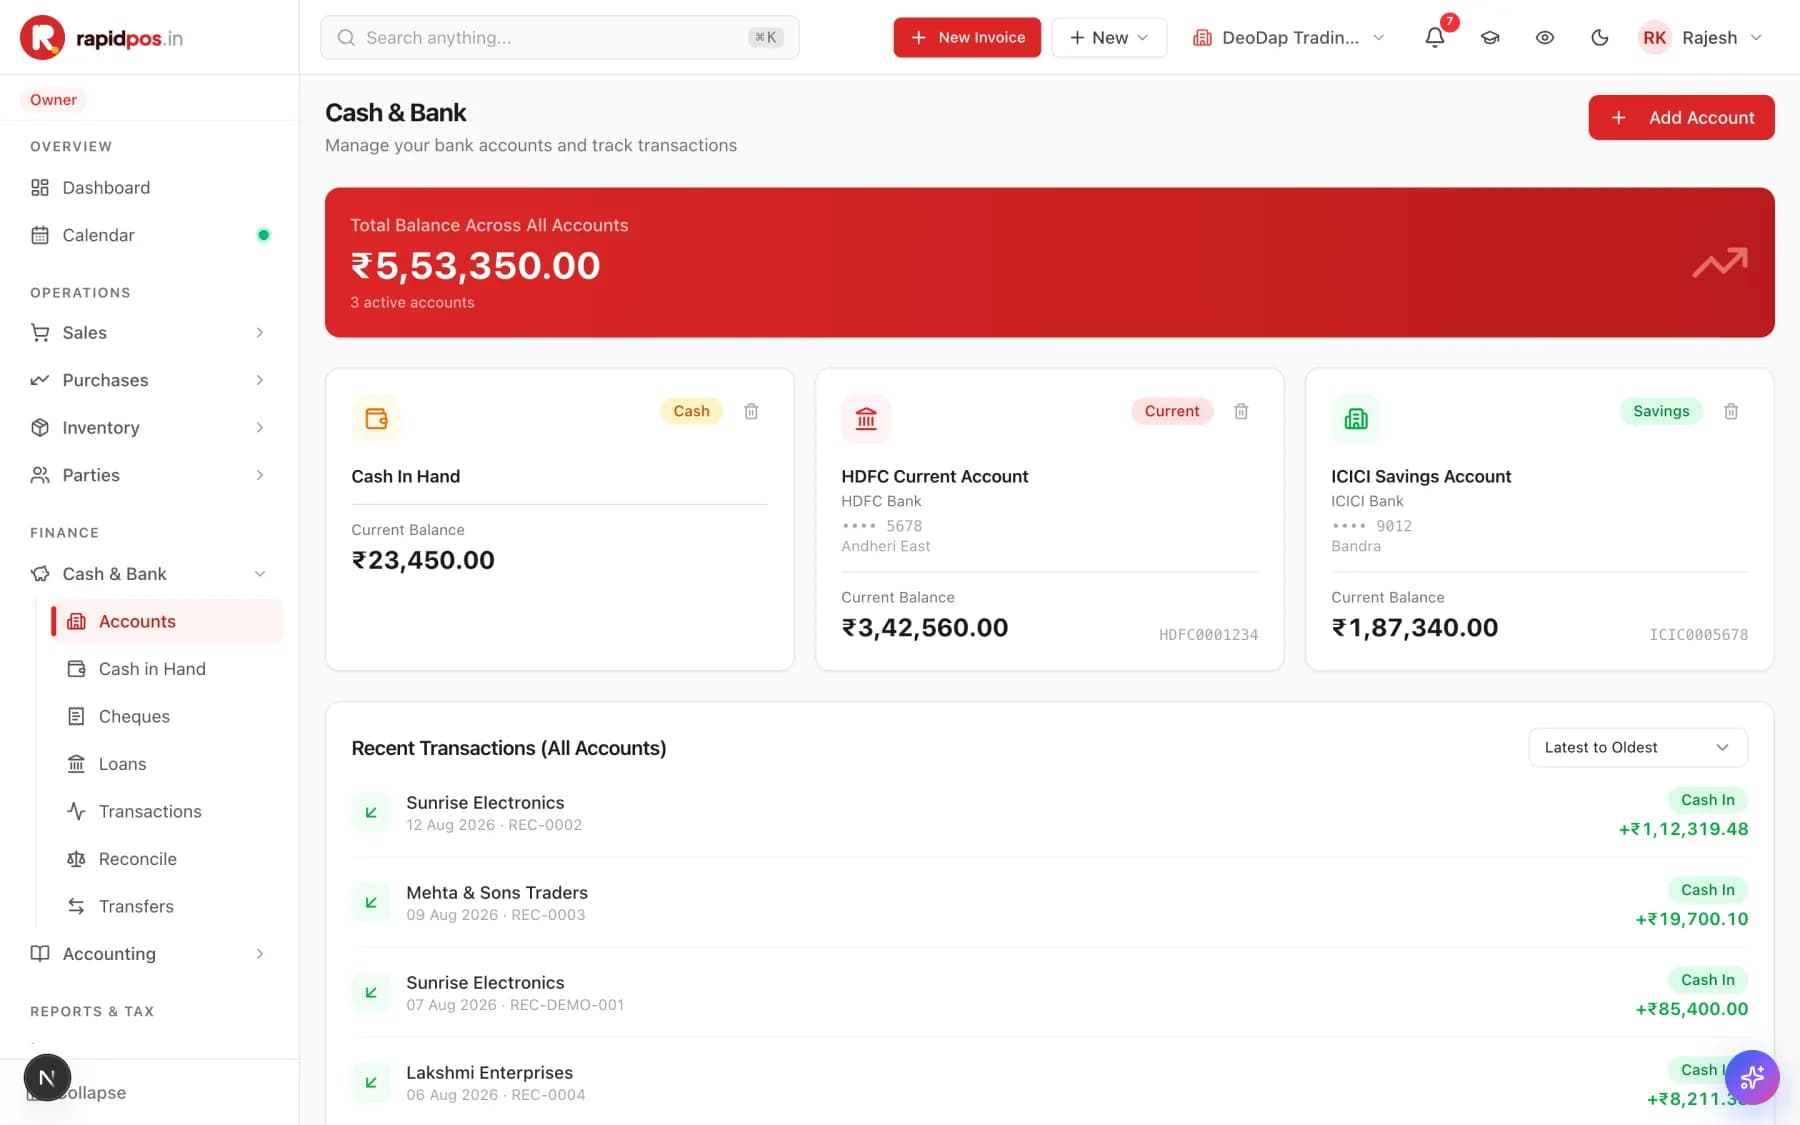
Cash & Bank → Accounts

The Cash & Bank screen with a red banner showing Total Balance Across All Accounts, three account cards for Cash In Hand, an HDFC current account and an ICICI savings account, and a Recent Transactions list.
The Cash and bank screen in RapidPOS.

What this screen is for

Every place your money sits — the cash drawer and each bank account — with a live balance driven by the payments you record.

What each button does

Add Account
Adds a bank account or another cash box.
Total Balance Across All Accounts
Everything you hold, added up.
Cash In Hand card
Physical cash. Should match the notes in your drawer at close of day.
Recent Transactions
Every movement in and out, newest first. Cash In is green; money out is shown against the account it left.
Cash in Hand (left menu)
A dedicated screen to record cash taken out or put in.
Reconcile (left menu)
Ticks off your RapidPOS entries against your real bank statement, so you can spot anything missed.
Transfers (left menu)
Moves money between your own accounts — e.g. depositing till cash into the bank. Use this rather than recording it as income.
Cheques (left menu)
Tracks cheques received and issued that have not cleared yet.

Do it step by step

  1. Open Cash & Bank → Accounts and press Add Account for each bank account you use.
  2. Enter the account name, bank and current balance.
  3. At close of business, compare the Cash In Hand figure with the cash actually in the drawer.
  4. Once a month, use Reconcile to check RapidPOS against your bank statement.

Tips that save time

  • When you deposit till cash into the bank, use Transfers. Recording it any other way double-counts it as income.
  • A daily 30-second cash check catches mistakes while you can still remember what happened.

Common mistakes to avoid

  • Editing an account balance by hand to make it match. That hides the missing entry instead of finding it — the underlying payment or expense is still absent from your books.

Keeping an eye on things

Stock alerts, reports and GST returns — the parts that keep you out of trouble.

Low stock alerts

What to re-order, before you run out.

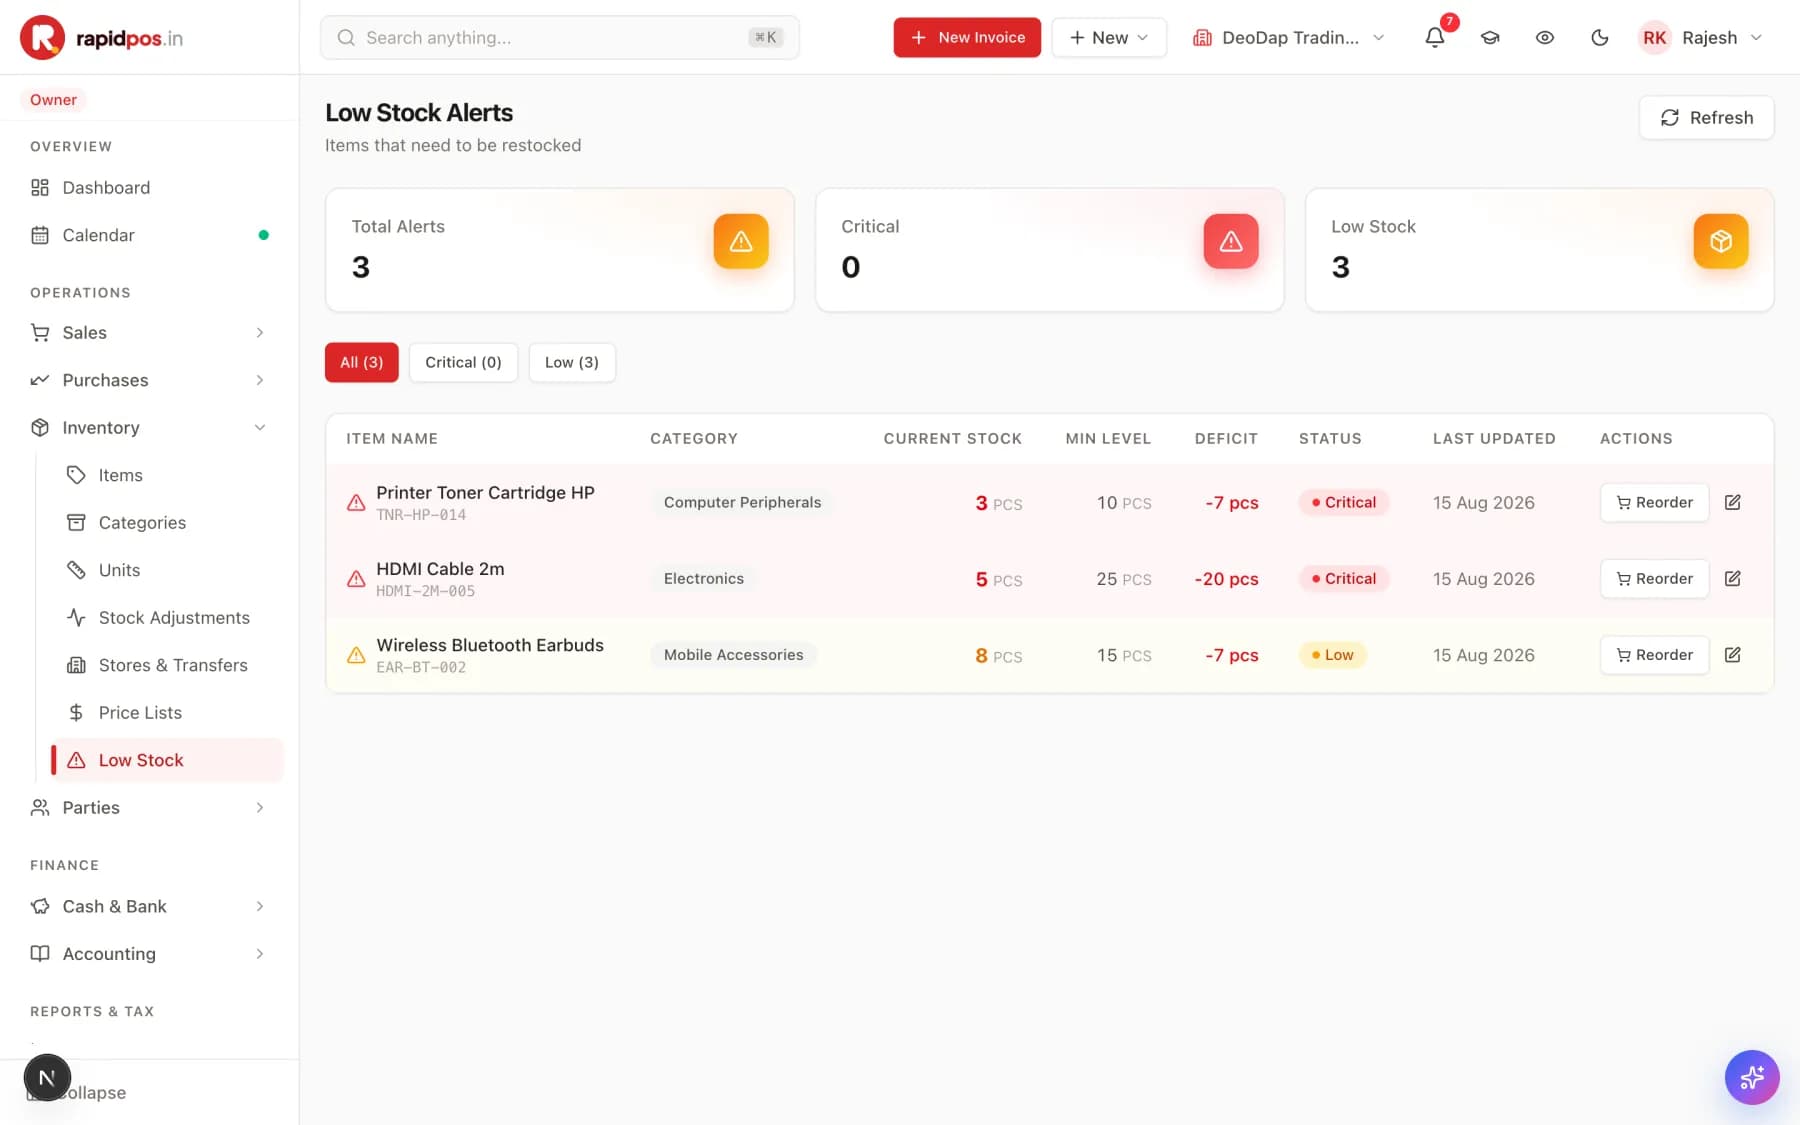
Inventory → Low Stock

The Low Stock Alerts screen with cards for Total Alerts, Critical and Low Stock, filter chips, and a table listing items with current stock, minimum level, deficit, status and a Reorder button on each row.
The Low stock alerts screen in RapidPOS.

What this screen is for

Your shopping list, written by the software. It shows every item that has fallen below the Min Stock level you set when creating it.

What each button does

All / Critical / Low chips
Filters the list. Critical items need attention today.
DEFICIT column
How many units short you are — buy at least this many.
Reorder (row)
Starts a purchase order for that item with the supplier.
Pencil icon (row)
Edits the item — use it to change the Min Stock level if the alert is firing too early or too late.
Refresh
Recalculates the alerts against current stock.

Do it step by step

  1. Open Inventory → Low Stock.
  2. Start with the Critical chip.
  3. Read the Deficit column to see how much to buy.
  4. Press Reorder to raise a purchase order, or note it down for your next supplier call.

Tips that save time

  • This screen is only as good as the Min Stock numbers you set. If it is empty and you keep running out, your minimums are set too low — or not set at all.
  • Set Min Stock to roughly what you sell while waiting for a delivery. Fast-moving items with slow suppliers need a higher number.

Common mistakes to avoid

  • Ignoring the alerts because 'I know my stock'. The whole point is catching the slow-moving item you have not thought about in a month.

Reports

Fifty-plus ready-made answers about your business.

Reports

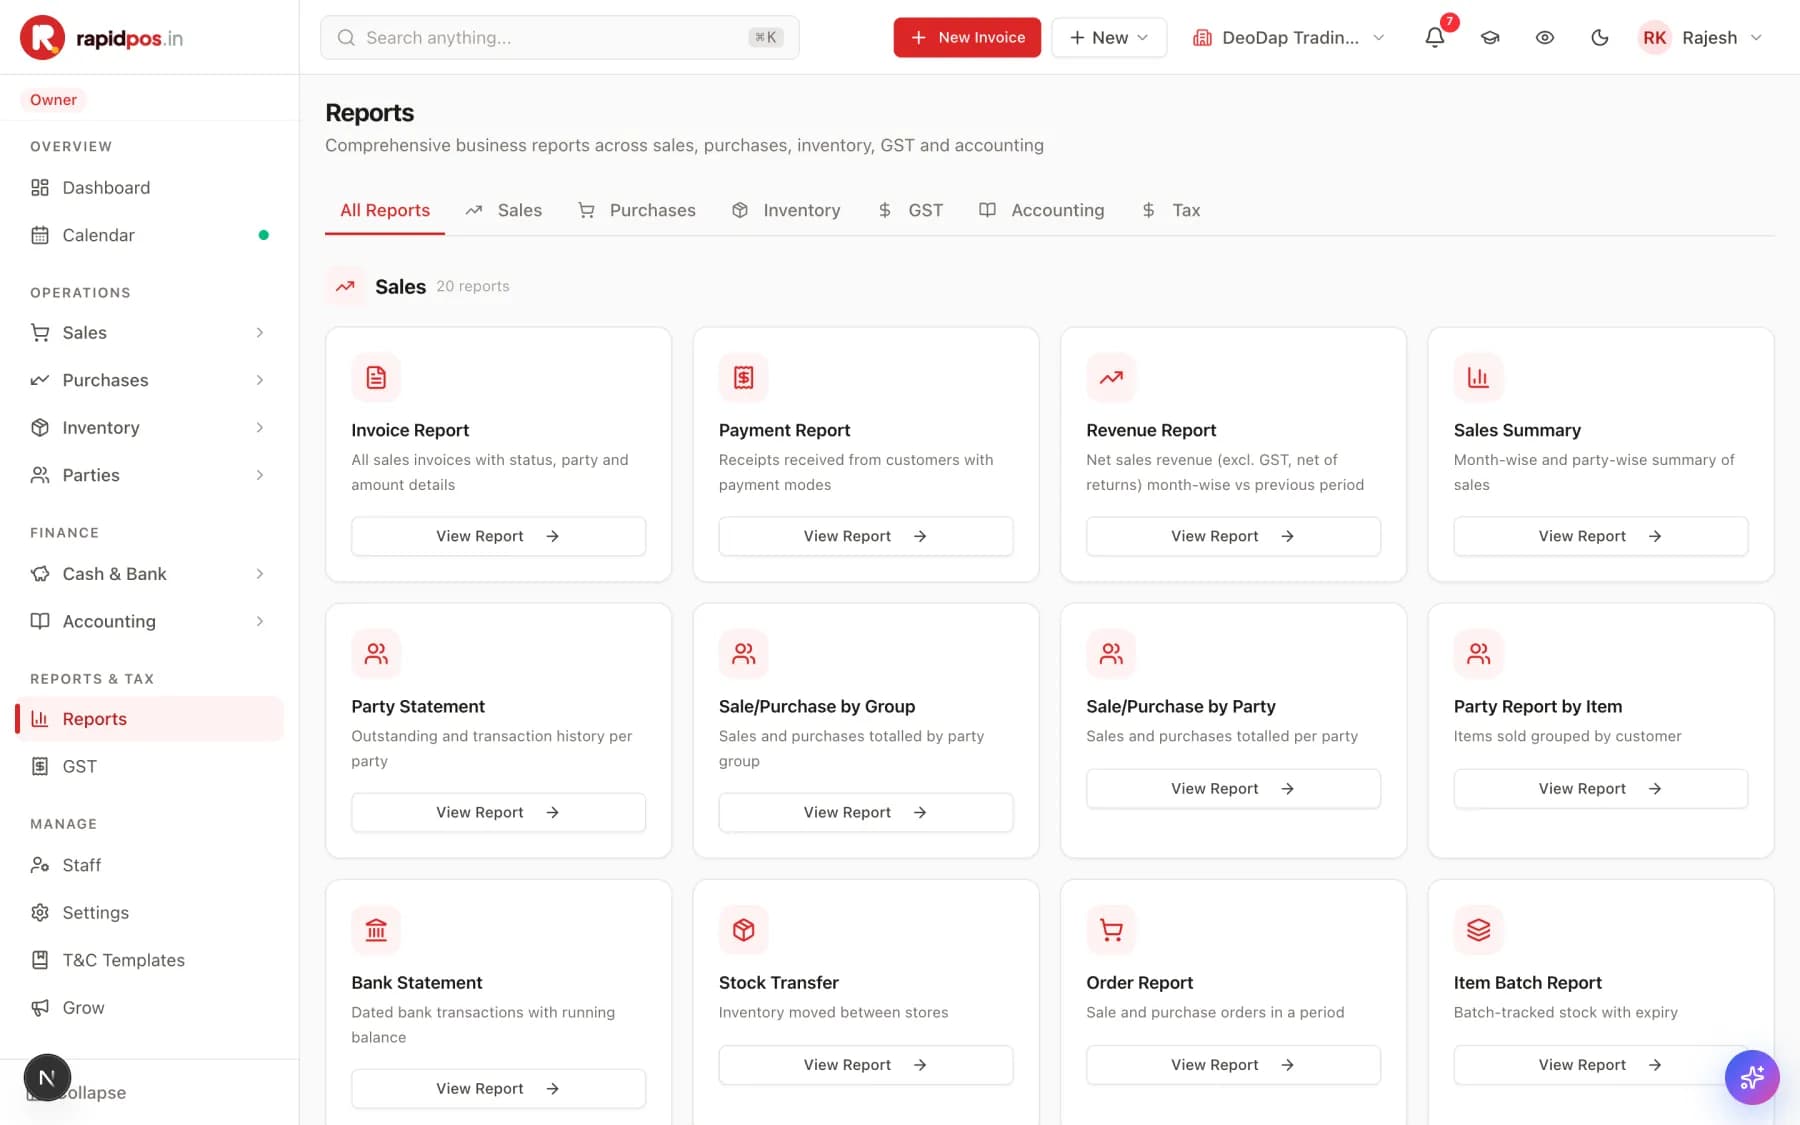
The Reports hub with tabs for All Reports, Sales, Purchases, Inventory, GST, Accounting and Tax, showing cards for Invoice Report, Payment Report, Revenue Report, Sales Summary, Party Statement and more, each with a View Report button.
The Reports screen in RapidPOS.

What this screen is for

Every question you might ask — which item makes the most profit, who buys the most, what is sitting unsold — already has a report. You pick one and set a date range.

What each button does

All Reports / Sales / Purchases / Inventory / GST / Accounting / Tax tabs
Groups the reports by subject so you are not scrolling through all of them.
View Report
Opens that report. Every one lets you set a date range and export the result.
Party Statement
One customer's or supplier's complete history with a running balance. Send it to anyone disputing what they owe.
Sales Summary
Sales by month and by customer — your top-line trend.
Item Profit (Inventory tab)
Profit per product. Tells you what is actually worth selling.
Outstanding Report
Everyone who owes you money, oldest first.

Do it step by step

  1. Open Reports from the sidebar.
  2. Pick a tab, or scan the cards on All Reports.
  3. Press View Report.
  4. Set the date range at the top.
  5. Export it if you need to send it to your accountant.

Tips that save time

  • Four reports cover most needs: Sales Summary, Item Profit, Outstanding Report and Stock Report.
  • Accounting → Profit & Loss and Balance Sheet are built automatically from your entries — nothing to prepare.

Common mistakes to avoid

  • Reading a report before entering the month's purchases and expenses, then believing the profit figure.

GST returns

GSTR-1, GSTR-3B and the file you upload to the portal.

GST → GSTR-1

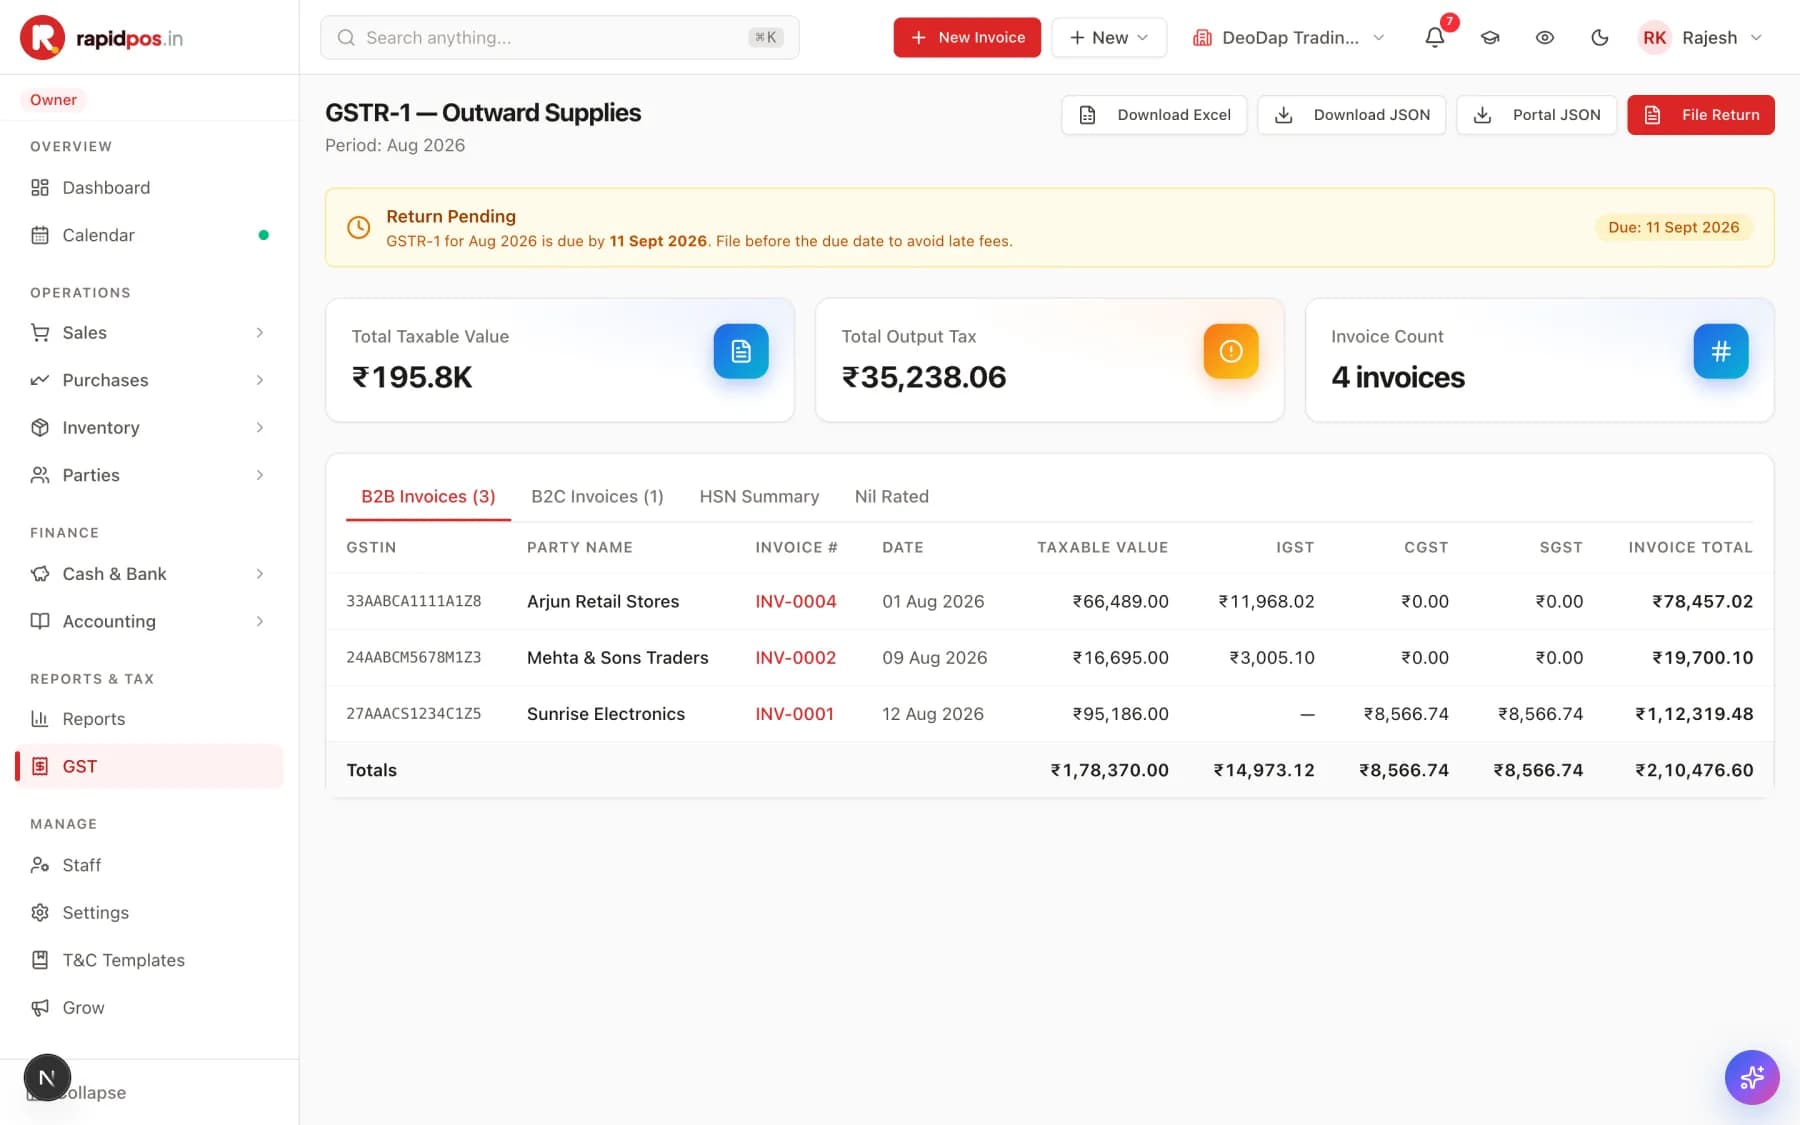
The GSTR-1 Outward Supplies screen showing a Return Pending banner with a due date, cards for Total Taxable Value, Total Output Tax and Invoice Count, tabs for B2B and B2C invoices, HSN Summary and Nil Rated, and a table of invoices with GSTIN and tax breakdown.
The GST returns screen in RapidPOS.

What this screen is for

Your GST return, built from the invoices you already entered. RapidPOS sorts them into B2B and B2C, works out the tax, and produces the file the GST portal wants.

What each button does

Return Pending banner
Tells you which period is due and the deadline. It disappears once the return is marked filed.
B2B Invoices tab
Sales to GST-registered businesses — the ones with a GSTIN.
B2C Invoices tab
Sales to ordinary consumers with no GSTIN.
HSN Summary tab
Sales grouped by HSN code, which the return requires.
Portal JSON
Downloads the file in the exact format the GST portal accepts. This is the one you upload.
Download Excel
The same data as a spreadsheet, for checking or for your accountant.
File Return
Marks the period as filed in RapidPOS. It does not file with the government — you still upload on the portal.

Do it step by step

  1. Open GST → GSTR-1 and check the period shown at the top.
  2. Compare the Invoice Count against your own records for that month.
  3. Look through the B2B tab and confirm every customer GSTIN is present and correct.
  4. Press Portal JSON to download the upload file.
  5. Log in to the GST portal and upload that file there.
  6. Come back and press File Return to mark the period done in RapidPOS.

What happens after you press it

The pending banner clears and the period is marked filed. Your invoices are unchanged — nothing is locked.

Be careful

  • File Return only updates RapidPOS. Your return is not filed with the government until you upload on the GST portal yourself.
  • Fix mistakes BEFORE you upload. Once a return is filed with the portal, corrections have to go through amendments — which is far more work.

Common mistakes to avoid

  • Missing GSTINs on B2B customers. Those sales land in B2C, your customer cannot claim their input credit, and they will call you about it.
  • Filing before the month's invoices are all entered. Enter everything first, then check the count, then file.

Your team and your data

Give staff their own logins, and keep a copy of everything.

Staff and roles

A login for each person, and control over what they can see.

Staff

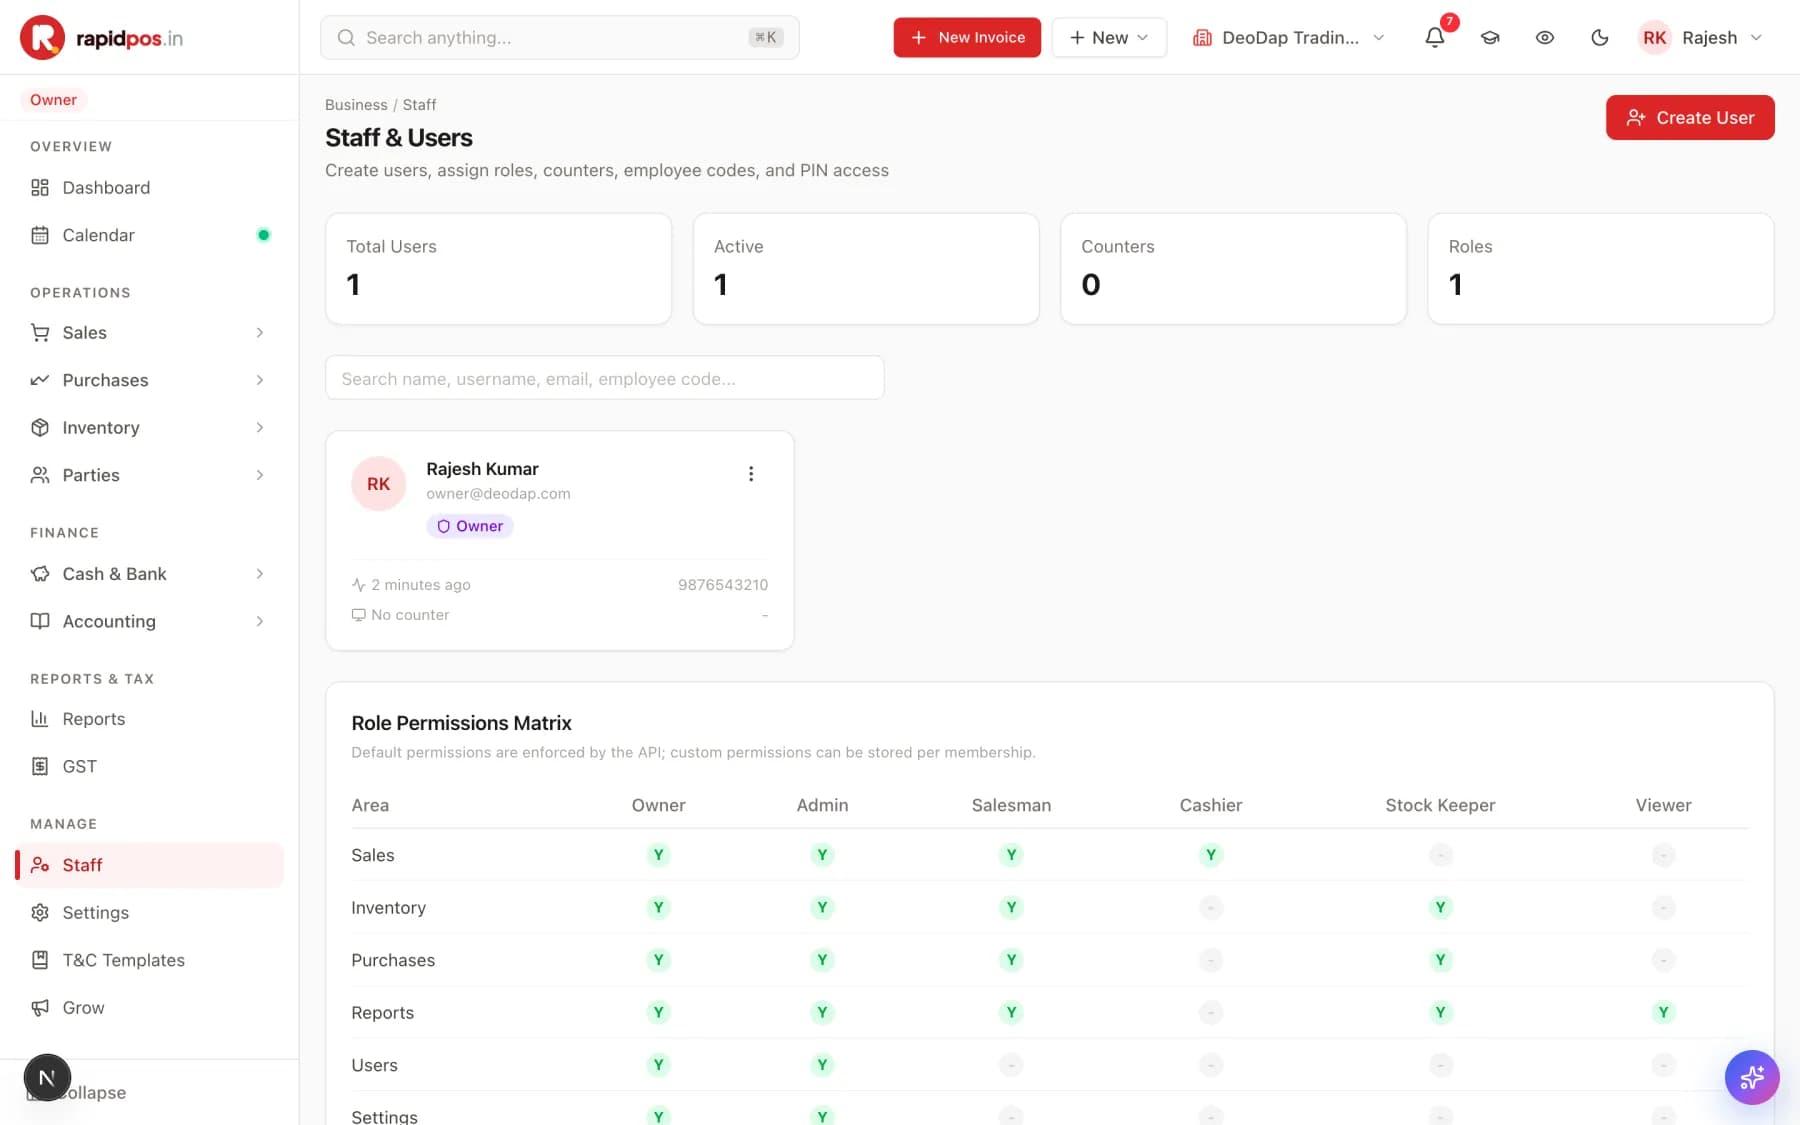
The Staff & Users screen with cards for Total Users, Active, Counters and Roles, a user card for the owner, and a Role Permissions Matrix table showing which areas Owner, Admin, Salesman, Cashier, Stock Keeper and Viewer can access.
The Staff and roles screen in RapidPOS.

What this screen is for

Creates a separate login for every person who uses RapidPOS, and decides what each of them is allowed to see and do.

What each button does

Create User
Adds a team member: name, login details and a role.
Role Permissions Matrix
The table at the bottom showing exactly which areas each role can reach. Read it before choosing a role.
Owner
Full access to everything, including settings and other users.
Admin
Same broad access as Owner — for a trusted manager.
Cashier
Sales only. The right role for counter staff: they can bill, but cannot see purchase costs, profit or reports.
Salesman
Sales, inventory, purchases and reports — but not users or settings.
Stock Keeper
Inventory, purchases and reports. No access to sales.
Viewer
Reports only, read-only. For an accountant who needs to look but not touch.
⋮ on a user card
Edits, deactivates or resets the password for that person.

Do it step by step

  1. Open Staff from the sidebar and press Create User.
  2. Enter the person's name, mobile number and email.
  3. Read the Role Permissions Matrix and pick the smallest role that still lets them do their job.
  4. Save, and give them their login details.

Tips that save time

  • Cashier is the right role for counter staff. They can bill all day without ever seeing your purchase prices or profit margins.
  • When someone leaves, deactivate their user immediately from the ⋮ menu.

Be careful

  • Never share one login between staff. The Activity Log records who did what — with a shared login, you lose the ability to tell.

Common mistakes to avoid

  • Making everyone an Admin because it is easier. Every person then sees your costs and margins, and any of them can change your settings.

Backups, imports and barcodes

Bring data in, get data out, and keep a safety copy.

Utilities

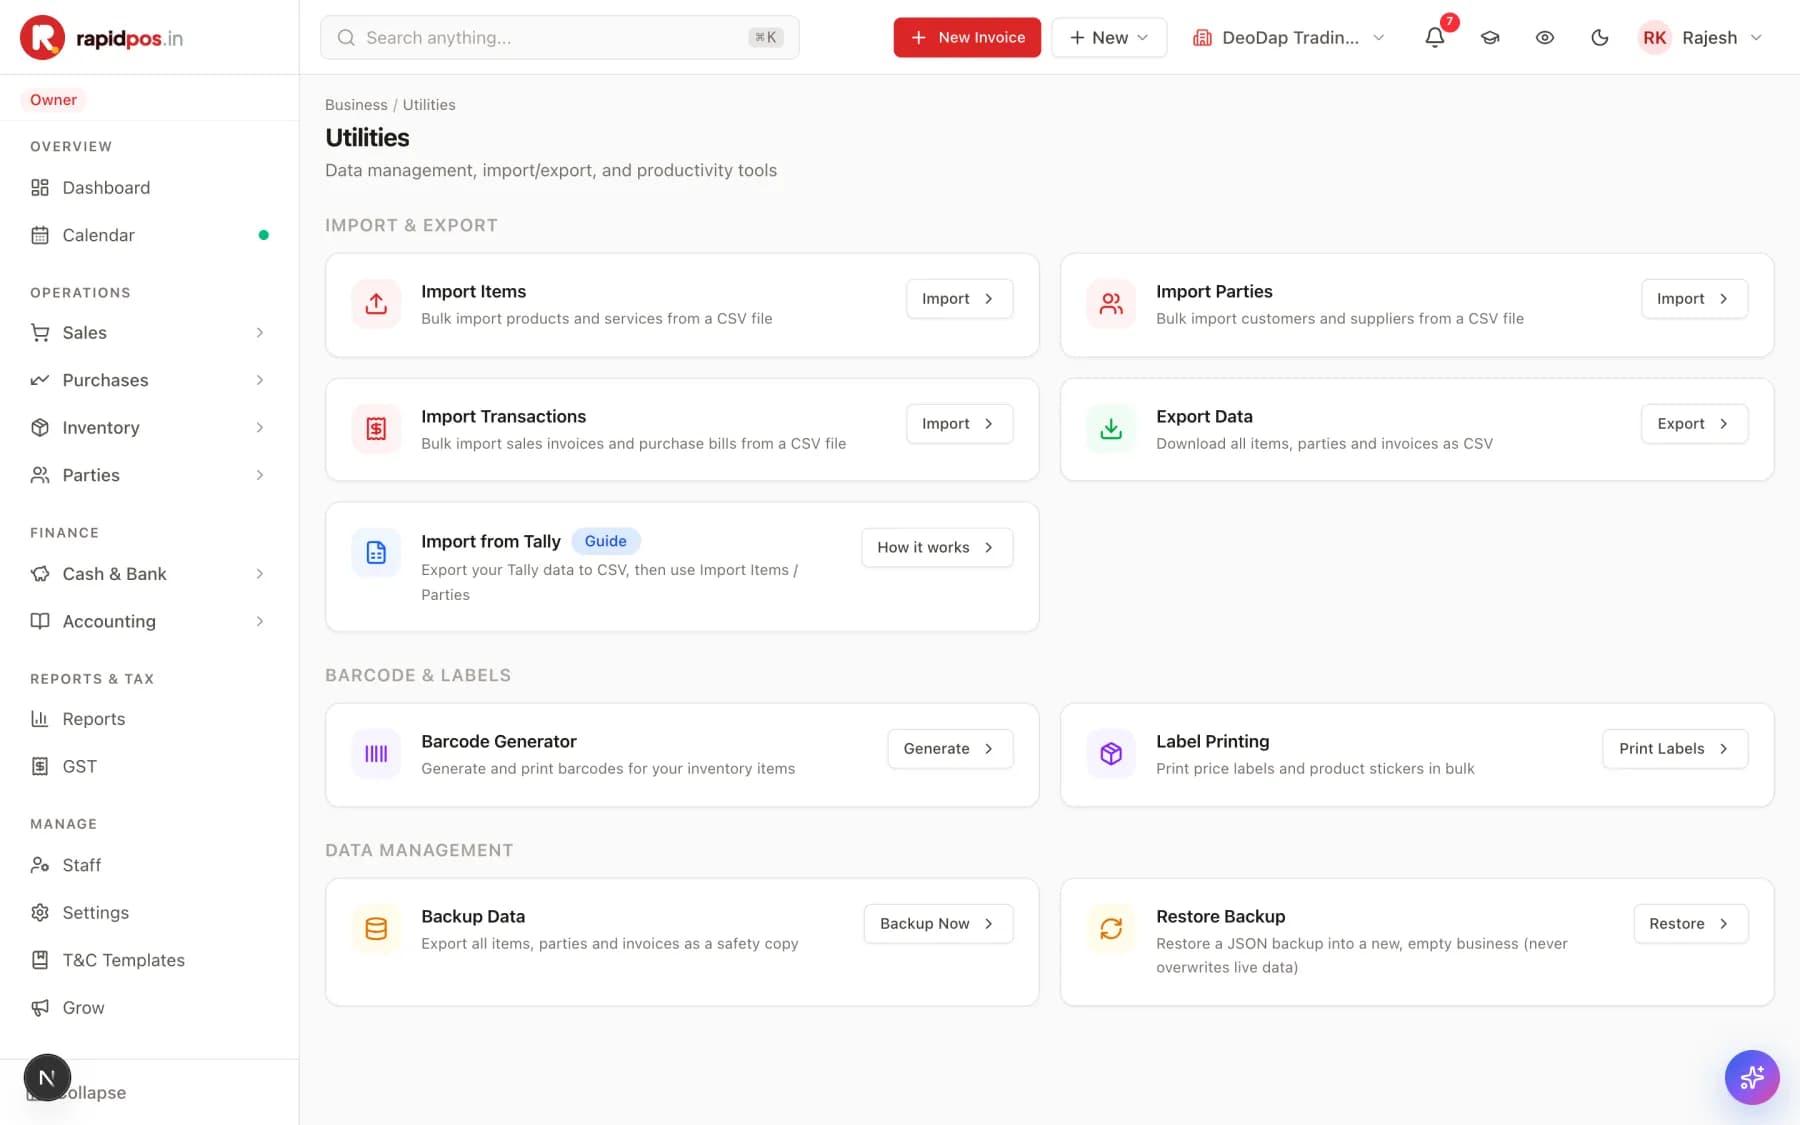
The Utilities screen grouped into Import & Export (Import Items, Import Parties, Import Transactions, Export Data, Import from Tally), Barcode & Labels (Barcode Generator, Label Printing) and Data Management (Backup Data, Restore Backup).
The Backups, imports and barcodes screen in RapidPOS.

What this screen is for

The toolbox. Bulk-import your existing lists when you start, print barcode labels, and take backups.

What each button does

Import Items
Loads your whole product list from a CSV file — the fastest way to set up a large catalogue.
Import Parties
Loads your customers and suppliers from a CSV file.
Import Transactions
Loads past sales invoices and purchase bills in bulk.
Import from Tally
Explains how to export from Tally to CSV and bring it in here. Press How it works for the steps.
Export Data
Downloads all your items, parties and invoices as CSV.
Barcode Generator
Creates barcodes for items that do not have one, so you can scan them at the POS.
Label Printing
Prints price labels and product stickers in bulk.
Backup Data
Downloads a complete safety copy of your business. Keep it somewhere off this computer.
Restore Backup
Loads a backup into a NEW, empty business. It never overwrites your live data.

Do it step by step

  1. Open Utilities from the sidebar.
  2. Starting out? Use Import Items and Import Parties to load your existing lists instead of typing them.
  3. Download the sample file first, fill it in, then upload — the columns must match.
  4. Once you are running, press Backup Now regularly and save the file somewhere safe.

Tips that save time

  • Take a backup before any big change — a bulk import, a mass price update, or year-end.
  • Barcode Generator plus Label Printing turns any item into something your scanner can read at the counter.

Be careful

  • A backup sitting on the same computer as RapidPOS is not a backup. Copy it to a pen drive or cloud storage.
  • Check the preview before confirming any import. A wrong column mapping can create hundreds of bad records, and undoing that by hand takes hours.

Common mistakes to avoid

  • Never taking a backup at all, then losing a year of data to a failed hard disk.
  • Expecting Restore Backup to fix a mistake in your live data. It restores into a fresh empty business — it does not roll back what you are working in.

If you get stuck

You do not have to remember all of this. Help is built into the software itself.

Ask inside the app

Tap the RapidPOS Support button at the bottom-right of any screen. Ask it a question in plain English and it will explain, and take you to the right page.

Turn on Guided Mode

Turn on Guided Mode under Settings → Guided Mode. RapidPOS then walks you through each screen the first time you open it.

Talk to a person

Still stuck? Open Support from the sidebar and raise a ticket — our team will get back to you.